
Taw qhia
The Learning Resources Gearbotics Robot Motorized Set provides a hands-on experience in constructing robotic models. This set includes 118 color-coded components, such as gears, cogs, and connectors, along with a motorized unit. Users can design and build robots capable of movement and sound production via a controller.
This manual provides essential information for the assembly, operation, and maintenance of your Gearbotics Robot Motorized Set. Please read these instructions carefully before use.

Image: The product packaging for the Gearbotics Robot Motorized Set, illustrating the assembled robot and its remote controller.
Ntim Cov Ntsiab Lus
The Gearbotics Robot Motorized Set includes the following components:
- 118 color-coded pieces (gears, cogs, connectors)
- Motorized unit with sound capabilities
- Tus tswj
- Robot head
- Grabber arms
- Lub log
- Instruction booklet for building models
Nco tseg: Four AA batteries are required for the motorized unit and two AA batteries for the controller, and are not included in the set.
Kev teeb tsa thiab kev sib dhos
1. Kev teeb tsa roj teeb
- Locate the battery compartment on the motorized unit and the controller.
- Siv lub hau ntswj me me (tsis suav nrog), qhib lub hau ntawm lub roj teeb.
- Insert four (4) AA batteries into the motorized unit, observing the correct polarity (+/-).
- Insert two (2) AA batteries into the controller, observing the correct polarity (+/-).
- Replace the battery compartment covers and secure them with the screws.
Tseem ceeb: Always use new batteries of the same type. Do not mix old and new batteries, or different types of batteries. Remove batteries if the product will not be used for an extended period.
2. Kev Sib Tham Thawj
The Gearbotics set is designed for creative construction. Refer to the included instruction booklet for detailed steps on building specific robot models. The general assembly process involves:
- Connecting Base Components: Begin by connecting the main structural pieces using the various connectors.
- Integrating Gears: Attach gears and cogs to create rotational movement. Ensure gears mesh properly for smooth operation.
- Attaching the Motorized Unit: Securely connect the motorized unit to the robot's structure, ensuring its output shaft aligns with the gears intended for movement.
- Ntxiv Accessories: Attach the robot head, grabber arms, wheels, and other decorative elements as desired or as instructed by the model guide.

Image: A fully assembled Gearbotics robot, showcasing its transparent gears, cogs, and structural components.
Cov lus qhia ua haujlwm
Once your robot is assembled and batteries are installed, you can begin operation using the controller.
- Ensure the motorized unit is securely connected to the robot and its power source (batteries).
- Use the directional controls on the controller to make the robot move forward or backward.
- Activate the sound function via the designated button on the controller to hear the robot's sounds.
- Experiment with different gear configurations and robot designs to observe varied movements and functions.
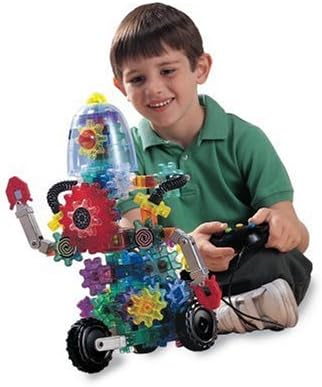
Image: A child interacting with the Gearbotics robot, using the remote controller to activate its functions.
Kev tu
Proper maintenance ensures the longevity and optimal performance of your Gearbotics set.
- Ntxuav: Wipe components with a dry or slightly damp cloth. Do not immerse the motorized unit or controller in water. Avoid harsh chemicals.
- Cia: Store all pieces in a clean, dry place away from direct sunlight and extreme temperatures.
- Kev kho roj teeb: Remove batteries from the motorized unit and controller if the set will not be used for an extended period to prevent leakage.
- Kev tshuaj xyuas cov khoom: Periodically inspect gears and connectors for any signs of wear or damage. Replace any broken or worn parts to maintain functionality.
Kev daws teeb meem
If you encounter issues with your Gearbotics Robot Motorized Set, refer to the following common solutions:
- Robot Does Not Move or Motor is Silent:
- Check if batteries are correctly installed in both the motorized unit and the controller, observing polarity.
- Ensure batteries are fresh and fully charged. Replace if necessary.
- Verify that all connections between the motorized unit and the robot's gears are secure and properly aligned.
- Gears Do Not Turn Smoothly or Jam:
- Inspect for any foreign objects or debris obstructing the gears.
- Ensure all gears are correctly meshed and not forced into position.
- Check for any damaged or worn gear teeth that might prevent smooth rotation.
- Controller tsis teb:
- Confirm batteries in the controller are fresh and correctly inserted.
- Ensure there are no obstructions between the controller and the robot's receiver.
If problems persist after attempting these solutions, please contact Learning Resources customer support.
Specifications
| Feature | Paub meej |
|---|---|
| Khoom Dimensions | 15 x 5 x 14 po |
| Yam Nyhav | 4.06 puj |
| Qauv nab npawb | LOJ 9188 |
| ASIN | B00004WGJS |
| Chaw tsim tshuaj paus pom zoo hnub nyoog | 6 xyoo thiab nce |
| Yuav tsum tau roj teeb | 4 AA batteries (not included) for motorized unit, 2 AA batteries (not included) for controller. |
| Hnub tso tawm | Lub Ib Hlis 1, 2007 |
| Chaw tsim tshuaj paus | Kev Kawm Txuj Ci |
Warranty thiab Support
For warranty information, replacement parts, or further assistance, please contact Learning Resources directly. Their official website or customer service contact details can typically be found on the product packaging or by searching online for "Learning Resources customer support".
Please have your product model number (LER9188) and purchase information available when contacting support.