
Taw qhia
This manual provides comprehensive instructions for the proper installation and use of the Metra 70-2001 Radio Wiring Harness. This harness is specifically designed to facilitate the installation of an aftermarket car stereo into compatible General Motors vehicles, ensuring a secure and reliable electrical connection without cutting factory wiring.
Cov ntaub ntawv kev nyab xeeb
- Always disconnect the vehicle's negative battery terminal before beginning any electrical installation to prevent short circuits and electrical shock.
- Ensure all wiring connections are secure and properly insulated using electrical tape, crimp connectors, or heat shrink tubing. Loose connections can lead to electrical malfunctions or fire hazards.
- Consult a professional automotive technician if you are unsure about any part of the installation process.
- Do not modify the wiring harness. Any alterations may void the product warranty and could cause damage to your vehicle's electrical system.
- Hnav cov khoom siv tiv thaiv tus kheej kom tsim nyog, xws li tsom iav kev nyab xeeb, thaum lub sijhawm teeb tsa.
Tsheb Compatibility
The Metra 70-2001 Radio Wiring Harness is compatible with select General Motors vehicles manufactured between 1994 and 2004. This includes various models from Buick, Cadillac, Chevrolet, GMC, Oldsmobile, and Pontiac within this year range.
Tseem ceeb: Always verify that your vehicle's factory wiring harness connector physically matches the Metra 70-2001 connector before proceeding with installation. Vehicle models and trim levels can vary, and some vehicles within the specified range may use a different connector.
Ntim Cov Ntsiab Lus
Upon opening the package, ensure all components are present and undamaged:
- Metra 70-2001 Radio Wiring Harness (GM 32-Pin Connector)

Image: The Metra 70-2001 Radio Wiring Harness shown in its retail packaging, indicating the product model and compatibility.
Cov Lus Qhia Txog Kev Teeb Tsa (Kev Teeb Tsa)
Cov cuab yeej xav tau
- Hlau Strippers
- Hlau Crimpers
- Hluav taws xob daim kab xev los yog cua sov Shrink Tubing
- Multimeter (optional, for verifying connections)
- Panel Removal Tools (for vehicle interior trim)
Pre-Installation Cov kauj ruam
- Disconnect roj teeb: Locate your vehicle's battery and disconnect the negative (-) terminal to prevent electrical hazards.
- Remove Factory Radio: Carefully remove the factory radio from the dashboard. This typically involves removing trim panels and unscrewing the radio unit.
- Identify Factory Harness: Locate the factory wiring harness that was connected to the original radio.
Kev Txuas Txuas Txuas
The Metra 70-2001 harness is designed to connect directly to your aftermarket radio's wiring. Match the wires from your aftermarket radio to the corresponding wires on the Metra 70-2001 harness. Refer to the wiring diagram section below for standard color codes. Ensure each connection is secure and properly insulated.
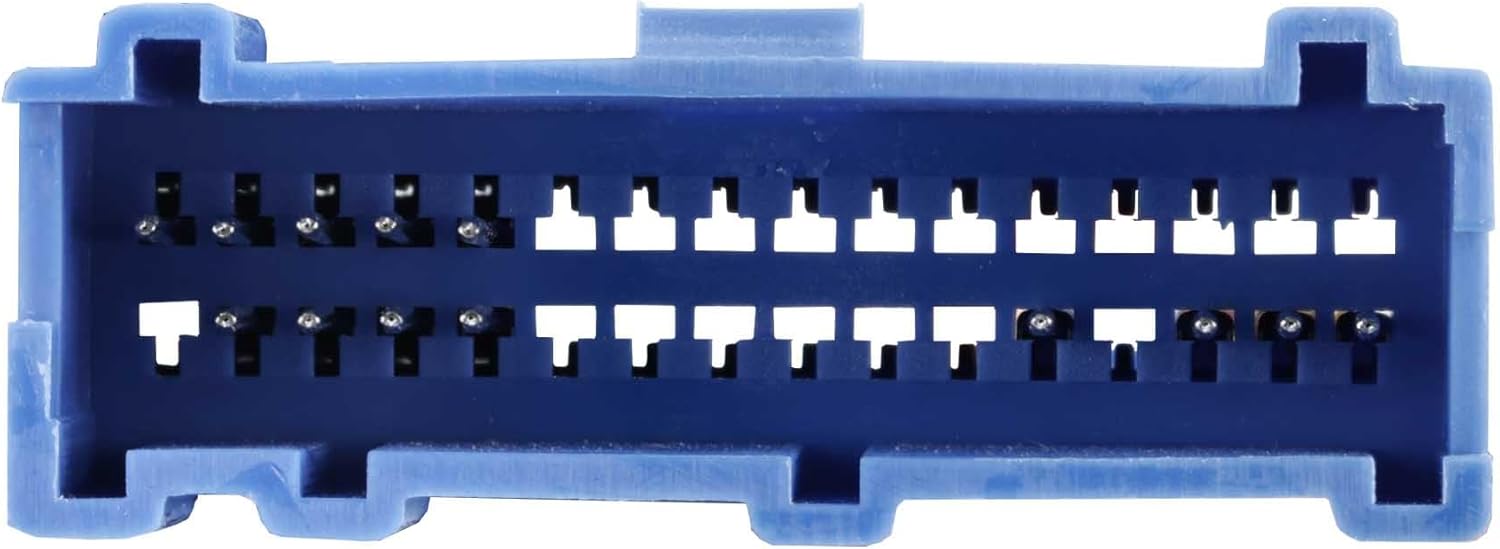
Image: The Metra 70-2001 Radio Wiring Harness showing the multi-colored wires ready for connection to an aftermarket radio.
Cov kauj ruam kawg
- Connect Harness: Plug the Metra 70-2001 harness into the vehicle's factory radio connector.
- Test Function: Reconnect the vehicle's negative battery terminal. Turn on the ignition and test the aftermarket radio's power, sound, and other functions.
- Secure and Reassemble: Once confirmed working, carefully tuck away excess wiring, mount the aftermarket radio, and reassemble any removed dashboard trim panels.
Kab kos duab
The following table outlines the standard wire color codes for the Metra 70-2001 harness. It is crucial to cross-reference these with the wiring diagram provided with your specific aftermarket radio, as color codes can vary between manufacturers.

Duab: Ib qho ntxaws view of the 32-pin connector on the Metra 70-2001 harness, showing the pin configuration.
| Hlau Xim | Muaj nuj nqi |
|---|---|
| Daj | 12V Constant Power |
| Liab | 12V Accessory Fais Fab |
| Dub | Hauv av |
| Txiv kab ntxwv | Teeb pom kev zoo |
| Xiav | Lub Hwj Chim Fais Fab / Amplifier tig-On |
| Dawb | Pem Hauv Ntej Sab laug Speaker (+) |
| Dawb / Dub | Pem Hauv Ntej Sab laug Speaker (-) |
| Grey | Pem hauv ntej sab xis hais lus (+) |
| Grey / Dub | Front Right Speaker (-) |
| Ntsuab | Sab laug Speaker (+) |
| Ntsuab / Dub | Sab laug Speaker (-) |
| Ntshav | Sab xis Speaker (+) |
| Ntshav / Dub | Sab xis hais lus (-) |
Kev ua haujlwm
Once correctly installed, the Metra 70-2001 Radio Wiring Harness functions as a direct interface between your aftermarket radio and the vehicle's existing electrical system. It provides the necessary power, ground, accessory, and speaker connections, allowing your new radio to operate as intended, delivering audio to the vehicle's speakers and receiving power from the ignition and constant battery sources.
Kev tu
The Metra 70-2001 Radio Wiring Harness is a passive electrical component and requires no routine maintenance. It is designed for a long service life once properly installed. Periodically, if you experience audio issues, you may check the harness connections to ensure they remain secure and free from corrosion or damage.
Kev daws teeb meem
- No Power to Radio:
- Check the vehicle's fuse box for any blown fuses related to the radio or accessory power.
- Ensure the yellow (constant power) and red (accessory power) wires are correctly connected and receiving voltage.
- Verify the black (ground) wire has a solid connection to chassis ground.
- Tsis muaj suab los ntawm cov neeg hais lus:
- Confirm all speaker wires (white, gray, green, purple and their black-striped counterparts) are correctly matched and connected between the radio and the harness.
- Check the radio's fader and balance settings.
- Ensure the radio's amplifier turn-on wire (if applicable, usually blue) is connected.
- Cov Teeb Meem Tsis Tu Ncua:
- Recheck all wire connections for looseness or poor contact. Ensure all crimps or solder joints are solid.
- Inspect the harness for any pinched or damaged wires.
Specifications
- Hom Tshuaj: Metra
- Qauv: 70-2001 : kuv
- Hom Connector: IDC (32-pin GM connector)
- Khoom siv: ABS, yas
- Cov Cheebtsam suav nrog: 1994–2005 GM 32-Pin into Car Harness
- Cable hom: Power & Speaker
- Yam khoom Dimensions (L x W x H): Kwv yees li 8 x 0.12 x 0.5 nti
- Yam khoom hnyav: Kwv yees li 22.68 grams
Warranty thiab Support
Warranty: This product comes with a 1-Year Limited Warranty from the date of purchase. This warranty covers defects in materials and workmanship under normal use. It does not cover damage resulting from improper installation, accident, abuse, or unauthorized modifications.
Kev Pab Txhawb Cov Neeg Siv Khoom: For technical assistance, troubleshooting, or warranty claims, please contact Metra Electronics customer service directly. You can find contact information and additional resources on the official Metra webqhov chaw.
Official Webqhov chaw: metraonline.com