
1. Taw qhia
This manual provides detailed instructions for the setup, operation, and maintenance of your Vibe Axcess 5-in-1 Universal Remote. Please read this manual thoroughly before using the remote control to ensure proper functionality and to maximize your user experience. This remote is designed to control up to five different audio/video devices.
2. Khoom Tshajview
The Vibe Axcess 5-in-1 Universal Remote is designed to consolidate control of multiple home entertainment devices into a single unit. It features dedicated buttons for various functions and device types.
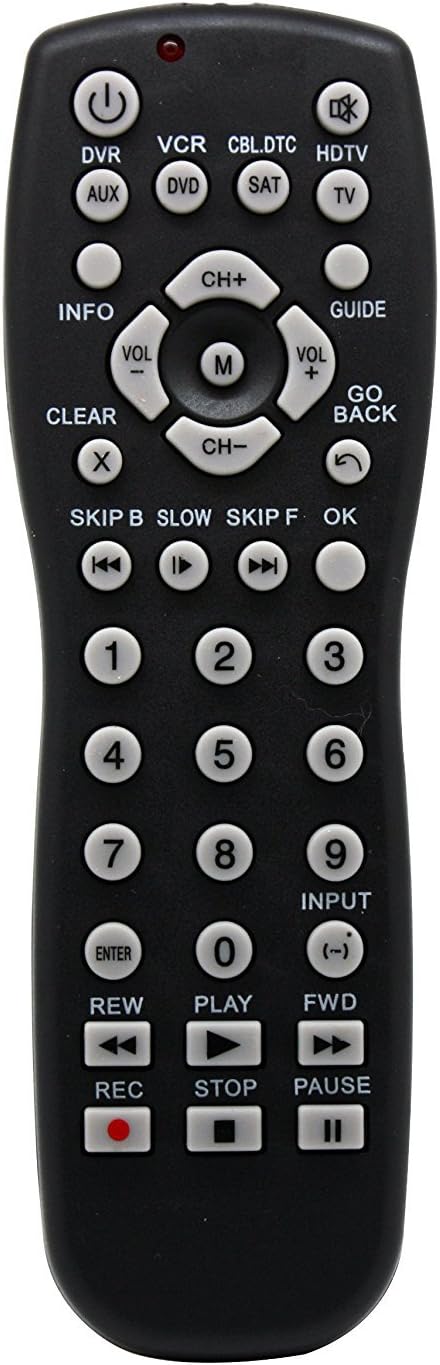
Daim duab 1: Pem hauv ntej view of the Vibe Axcess 5-in-1 Universal Remote. This image displays the remote's layout, including device selection buttons (DVR, VCR, CBL.DTC, HDTV, AUX, DVD, SAT, TV), navigation pad, number keys, and media control buttons (REW, PLAY, FWD, REC, STOP, PAUSE).

Daim duab 2: Packaging of the Vibe Axcess 5-in-1 Universal Remote. The packaging highlights the remote's 5-in-1 capability and compatibility with various device types such as DVD/VCR, HDTV, DVD, AUX, and CBL/SAT/CABLE.
3. Teeb tsa
3.1 Kev teeb tsa roj teeb
- Nrhiav lub roj teeb npog npog rau sab nraum qab ntawm cov chaw taws teeb tswj.
- Txav lub hau mus rau hauv qab los yog nias lub latch thiab tsa kom qhib.
- Insert two (2) AAA batteries, ensuring the positive (+) and negative (-) terminals match the diagrams inside the compartment.
- Hloov lub roj teeb lub hau npog, zawv zawg rov qab rau hauv qhov chaw kom txog thaum nws nyem kom ruaj ntseg.
Nco tseg: Always use fresh batteries and replace both batteries at the same time. Do not mix old and new batteries or different types of batteries.
3.2 Programming the Remote
To control your devices, the universal remote must be programmed with the correct codes for each device. There are typically two methods for programming:
3.2.1 Txoj Cai Nkag Mus Nkag
This method involves entering a specific code from a code list (usually provided with the remote or available online) for your device's brand.
- Qhib lub cuab yeej koj xav tswj (xws li TV, DVD player).
- Press and hold the desired device button on the remote (e.g., TV, DVD) for approximately 3 seconds until the indicator light (usually red) illuminates and stays on.
- While the indicator light is on, enter the 3-digit or 4-digit code for your device's brand using the number keys.
- If the code is valid, the indicator light will turn off. If the light flashes and remains on, the code was invalid; re-enter the code.
- Sim lub chaw taws teeb los ntawm kev nias lub Hwj chim button. If the device turns off, the code is correct. If not, try the next code listed for your brand.
3.2.2 Kev Tshawb Nrhiav Tus lej Pib
If you cannot find a code or direct code entry fails, use the auto code search method.
- Qhib lub cuab yeej uas koj xav tswj.
- Nias thiab tuav lub khawm ntaus ntawv uas koj xav tau (piv txwv li, TV) for approximately 3 seconds until the indicator light illuminates and stays on.
- Thaum tuav lub khawm ntaus ntawv, nias lub Hwj chim button once. The indicator light will start flashing, indicating it is searching for a code.
- Point the remote at the device and wait for the device to turn off. This may take several minutes as the remote cycles through codes.
- Thaum lub cuab yeej tua lawm, tam sim ntawd nias lub ENTER nias lub khawm kom txuag tau tus lej. Lub teeb qhia yuav tua.
- Test the remote's functions. If some functions do not work, repeat the auto search process to find a more compatible code.
4. Cov lus qhia ua haujlwm
Once programmed, operating your Vibe Axcess 5-in-1 Universal Remote is straightforward.
- Xaiv Ntaus Ntaus: Nias lub khawm ntaus ntawv uas sib xws (piv txwv li, TV, DVD, CBL.DTC) for the device you wish to control. The indicator light will briefly illuminate to confirm selection.
- Fais fab / Off: Nias lub Hwj chim khawm kom qhib lossis kaw lub cuab yeej xaiv.
- Volume Control: Siv cov VOL+ thiab VOL- nyees khawm los kho lub ntim.
- Channel tswj: Siv cov CH + thiab CH- khawm hloov cov channel.
- Cov Yooj Yim: Use the number keys (0-9) to directly enter channel numbers or other numerical inputs.
- Kev taw qhia: Siv lub pob qhia kev (sab saud, sab hauv qab, sab laug, sab xis) thiab OK khawm rau cov ntawv qhia zaub mov.
- Media Controls: Siv Ua si, PAUSE, TSIS TAU, REW, FWD, thiab REC for controlling media playback on compatible devices.
5. Kev tu
5.1 Kev ntxuav
To clean your remote, gently wipe it with a soft, dry cloth. Do not use abrasive cleaners, solvents, or harsh chemicals, as these can damage the remote's finish or internal components.
5.2 Hloov roj teeb
When the remote's performance degrades or the indicator light fails to illuminate, it is time to replace the batteries. Follow the battery installation steps in Section 3.1. Dispose of used batteries responsibly according to local regulations.
6. Kev daws teeb meem
- Tej thaj chaw deb tsis ua hauj lwm:
- Check if the batteries are inserted correctly and are not depleted. Replace if necessary.
- Ensure you have selected the correct device button (e.g., TV for your television).
- Verify that the remote is programmed with the correct code for your device. Re-program if unsure.
- Xyuas kom tsis muaj kev cuam tshuam ntawm cov chaw taws teeb thiab lub cuab yeej infrared sensor.
- Qee cov haujlwm tsis ua haujlwm:
- Some universal remote codes may not support all original remote functions. Try another code for your device brand using the programming steps.
- Ensure the device you are trying to control supports the specific function (e.g., not all TVs have a dedicated 'INFO' button function).
- Indicator light not illuminating:
- Xyuas thiab hloov cov roj teeb.
- If the issue persists after battery replacement, the remote may be faulty.
7. Cov lus qhia tshwj xeeb
- Qauv: OT795-KO
- Hom Tshuaj: Vibe
- Khoom Dimensions: 10.7 x 4 x 0.8 po
- Yam khoom hnyav: 4 hli
- Roj teeb: 2 AAA roj teeb yuav tsum tau (tsis suav nrog)
- Ntau npaum li cas cov khoom siv txhawb nqa: 5
- Connectivity Technology: Infrared
- Tshwj xeeb Feature: Universal
8. Warranty thiab Support
For information regarding warranty coverage or technical support, please refer to the documentation included with your purchase or contact the retailer where the product was acquired. Specific warranty terms may vary.