Taw qhia
Ua tsaug rau kev yuav khoomasing the STOGA Ubox STV040 Dual Lens Car DVR Camera. This manual provides detailed instructions for the proper installation, operation, and maintenance of your device. Please read this manual thoroughly before using the product to ensure optimal performance and safety.
Ntim Cov Ntsiab Lus
Thov xyuas cov khoom ntim thaum qhib. Yog tias cov khoom ploj lawm lossis puas lawm, hu rau koj tus neeg muag khoom.
- 1 x STOGA Ubox STV040 Car DVR Camera
- 1 x Tsheb Charger
- 1 x Car Mount
- 1 x External GPS Module
- 1 x User Manual
Khoom Tshajview
Familiarize yourself with the components and features of your STOGA Ubox STV040 Car DVR Camera.

Daim duab 1: Pem hauv ntej view of the DVR camera with the display screen active.

Daim duab 2: Pem hauv ntej view detailing the dual wide-angle lenses and surrounding controls.
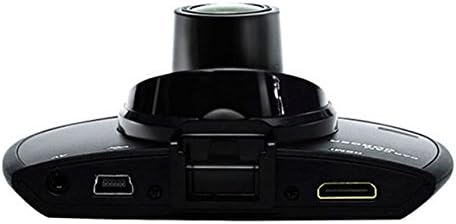
Daim duab 3: Sab saum toj view illustrating the connectivity ports (HDMI, USB, AV).

Daim duab 4: Angled perspective of the DVR camera, showing its compact design.
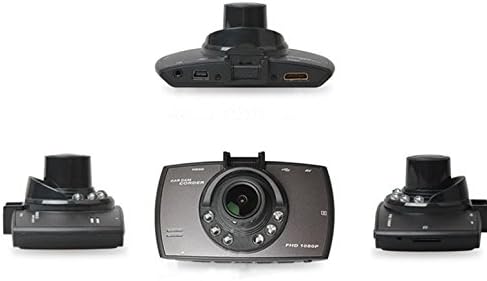
Daim duab 5: Kev dav view of the DVR camera from various angles.
Teeb tsa
1. Installing the Micro SD Card
Insert a Micro SD card (Class 6 or higher, 4GB-32GB) into the designated slot on the DVR camera. Ensure the card is inserted correctly until it clicks into place. The device supports continuous loop recording and emergency event recording.
2. Mount lub koob yees duab
- Attach the car mount to the windshield in a position that does not obstruct your view.
- Securely attach the DVR camera to the car mount.
- Adjust the camera angle to ensure both lenses capture the desired view (front and interior/side). The dual lenses are 180-degree rotatable.
3. Fais fab kev twb kev txuas
Connect the car charger to the DVR camera's power input and plug the other end into your vehicle's 12V power outlet (cigarette lighter socket). The camera will typically power on automatically when the vehicle starts and power off when the vehicle is turned off.
4. GPS Module Connection (Optional)
Connect the external GPS module to the designated GPS port on the DVR camera. This enables GPS logging, recording location data along with video footage.
Cov lus qhia ua haujlwm
Hwj chim On/Off
- Tsis siv neeg: The camera powers on and starts recording automatically when the car engine starts. It powers off automatically when the engine is turned off.
- Los Ntawm Txhais Tes: Nias thiab tuav lub pob fais fab kom qhib lossis kaw lub cuab yeej.
Cov Cim Cia Li Cas
- Loop Recording: The camera continuously records video in segments. When the memory card is full, it automatically overwrites the oldest unlocked footage.
- Kev Teev Xwm Ceev (G-Sensor): The built-in G-Sensor detects sudden impacts or collisions. In such an event, the current video segment is automatically locked and protected from being overwritten.
Ntawv Qhia Xaiv Khoom Noj
Use the control buttons located on the device to navigate through the menu options on the 2.0" TFT LCD screen. Adjust settings such as video resolution, date/time stamp, language (English, Chinese, Japanese, Russian), and G-Sensor sensitivity.
Ua si
- Tsum kaw yog tias tam sim no ua haujlwm.
- Enter playback mode via the menu.
- Xaiv qhov xav tau video file for playback on the device screen.
- Alternatively, remove the Micro SD card and insert it into a computer to view files.
Kev tiv thaiv tus password
The device supports password protection to prevent unauthorized access to recordings. Refer to the on-screen menu for setting up and managing this feature.
Kev tu
- Ntxuav: Siv cov ntaub mos mos, qhuav los ntxuav lub koob yees duab lo ntsiab muag thiab tshuaj ntsuam. Tsis txhob siv cov tshuaj abrasive los yog cov kuab tshuaj.
- Daim npav Micro SD: Format the Micro SD card regularly (e.g., once a month) to ensure optimal performance and prevent data corruption. Back up important files ua ntej formatting.
- Kub: Avoid exposing the device to extreme temperatures, direct sunlight for prolonged periods, or high humidity.
- Hloov tshiab Firmware: Xyuas cov chaw tsim khoom weblub vas sab tsis tu ncua kom paub txog cov kev hloov kho firmware uas muaj los txhim kho kev ua tau zoo thiab ntxiv cov yam ntxwv.
Kev daws teeb meem
| Teeb meem | Ua Tau / Kev daws teeb meem |
|---|---|
| Lub koob yees duab tsis muaj hwj chim. |
|
| Kev kaw suab nres tsis tau xav txog. |
|
| Tsis zoo video. |
|
| GPS tsis ua haujlwm. |
|
| Battery does not hold charge. |
|
Specifications
| Feature | Paub meej |
|---|---|
| Qauv nab npawb | Ubox STV040 |
| Zaub | 2.0" TFT LCD (960 x 240 pixels) |
| Lens | Dual 140-degree A+ wide-angle, 180-degree rotatable |
| Sensor | CMOS |
| Video daws teeb meem | 1280 x 480 @ 30 fps, 640 x 480 @ 30 fps |
| Video Format | AVI |
| Duab hom | M-JPG |
| Hmo Ntuj Pom Kev | Kev pom kev tsaus ntuj hmo ntuj muaj nuj nqi |
| Cia | Micro TF (SD HC) card, 4GB-32GB, Class 6 and above |
| GPS | Supports external GPS module |
| G-Sensor | Integrated, supports emergency event recording lock |
| Microphone / hais lus | Kev koom ua ke |
| Tso zis | CVBS (Video Output) |
| Roj teeb | 3.7V 700mA Lithium-Polymer battery |
| Kev khiav hauj lwm System Compatibility | Windows 2000/XP/Vista/Windows 7 |
| Lus txhawb | English, Chinese, Japanese, Russian |
Warranty thiab Support
For warranty information and technical support, please refer to the documentation provided with your purchase or contact your retailer. Keep your purchase receipt as proof of purchase for warranty claims.
For further assistance, you may also visit the official STOGA website (if available) or contact their customer service department.