1. Cov ntaub ntawv tseem ceeb ntawm kev nyab xeeb
Please read this instruction manual carefully before using the appliance and save it for future reference. Incorrect use may result in electric shock, fire, or serious injury.
- Cov khoom siv no tsuas yog siv rau hauv tsev neeg xwb. Tsis txhob siv sab nraum zoov lossis rau ntawm cov chaw ntub dej.
- Tsis txhob cia cov me nyuam ua lub tshuab nqus tsev vacuum. Kev saib xyuas kaw yog tsim nyog thaum siv ze cov menyuam yaus.
- Tsis txhob khaws cov khoom siv hluav taws xob los yog cov khoom siv hluav taws xob, xws li roj av, lossis siv rau hauv thaj chaw uas lawv tuaj yeem muaj.
- Tsis txhob khaws tej yam uas kub hnyiab lossis haus luam yeeb, xws li luam yeeb, ntais ntawv, lossis cov tshauv kub.
- Tsis txhob siv yam tsis muaj lub khob plua plav thiab / lossis cov lim dej hauv qhov chaw.
- Turn off the appliance before connecting or disconnecting the motorized brush, crevice tool, or square brush.
- Tsuas yog siv lub charger muab los ntawm cov chaw tsim khoom kom rov them dua.
- Tsis txhob kov lub charger lossis khoom siv tes ntub dej.
2. Khoom Tshajview
The Princess 339490 Rapido Cordless Stick Vacuum Cleaner is designed for efficient cleaning of various surfaces. It features a powerful motor, a removable battery, and multiple attachments for versatile use.
Cov Cheebtsam suav nrog:
- Princess Rapido Cordless Vacuum Unit
- Wall-mounted Charging Station
- Cov cuab yeej Crevice
- Square Txhuam
- Li-ion Roj Teeb Pob
- Main Brush Head (Motorized)
- Nqus Tube
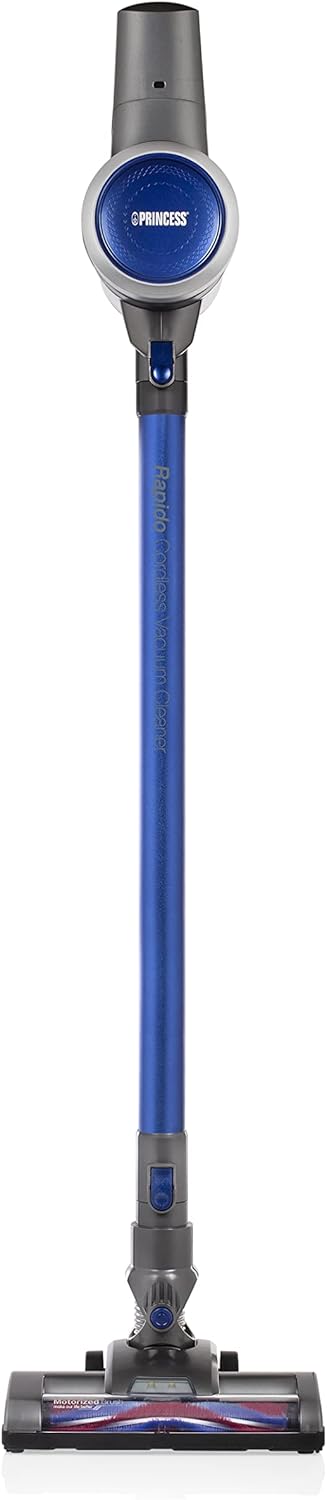
Daim duab 2.1: Pem hauv ntej view of the Princess 339490 Rapido Cordless Stick Vacuum Cleaner.

Daim duab 2.2: Angled view of the Princess 339490 Rapido Cordless Stick Vacuum Cleaner, showing its sleek design.

Figure 2.3: Close-up of the motorized brush head, designed for effective cleaning on various floor types.

Figure 2.4: The vacuum unit configured as a handheld cleaner with the crevice tool attached, ideal for tight spaces.
3. Teeb tsa
3.1 Kev sib dhos
- Attach the Vacuum Tube: Insert the vacuum tube into the main vacuum unit until it clicks securely into place.
- Attach the Main Brush Head: Connect the motorized brush head to the other end of the vacuum tube, ensuring it locks firmly.
- Nruab lub roj teeb: Slide the Li-ion battery pack into the designated slot on the main vacuum unit until it clicks. Ensure it is fully seated.

Figure 3.1: Proper insertion of the Li-ion battery pack into the main vacuum unit.
3.2 Kev them nyiaj yug
Before first use, fully charge the battery for approximately 4 hours.
- Mount the Charging Station: Secure the wall-mounted charging station in a convenient location near a power outlet.
- Place the Vacuum: Hang the assembled vacuum cleaner on the charging station. Ensure the charging contacts align.
- Txuas rau Fais Fab: Plug the charging station into a standard electrical outlet.
- Saib xyuas kev them nyiaj: The charging indicator light on the vacuum unit will illuminate during charging. It will change color or turn off when fully charged.
Figure 3.2: The charging indicator light, which shows the charging status of the battery.
4. Cov lus qhia ua haujlwm
4.1 Hwj chim Rau/Tawm
To turn the vacuum cleaner on, press the power button located on the handle. Press it again to turn off the appliance.

Figure 4.1: The handle and trigger mechanism for operating the vacuum cleaner.
4.2 Siv raws li lub tshuab nqus tsev vacuum
With the vacuum tube and main brush head attached, the appliance functions as a stick vacuum, suitable for floors and carpets. The luxury brush head is designed to transition smoothly between hard floors and carpets without needing to change attachments.
4.3 Siv ua lub tshuab nqus tsev nqus
To convert to a handheld vacuum, detach the vacuum tube and main brush head from the main unit. You can then attach the crevice tool or square brush directly to the main vacuum unit for cleaning stairs, upholstery, or car interiors.
Figure 4.2: The main unit used as a handheld vacuum with the crevice tool for detailed cleaning.
4.4 Lub Sijhawm Siv Roj Teeb
The fully charged Li-ion battery provides approximately 32 minutes of continuous operation, allowing you to clean an entire floor without interruption.
5. Kev tu
Kev saib xyuas tsis tu ncua ua kom pom kev ua haujlwm zoo thiab txuas ntxiv lub neej ntawm koj lub tshuab nqus tsev vacuum.
5.1 Emptying lub Dustbin
The dustbin should be emptied regularly, especially when the MAX line is reached.
- Xyuas kom lub tshuab nqus tsev yog muab tua.
- Hold the main unit over a waste bin.
- Nias lub pob tso lub thoob khib nyiab kom qhib lub hau hauv qab thiab nchuav cov khoom hauv.
- Close the flap securely until it clicks.

Figure 5.1: The transparent dustbin showing the HEPA filter inside, indicating the MAX fill line.
5.2 Ntxuav lub HEPA Lim
The removable HEPA filter should be cleaned periodically to maintain suction power.
- Turn off the vacuum cleaner and remove the dustbin.
- Carefully remove the HEPA filter from the dustbin.
- Coj mus rhaub lub lim kom maj mam hla lub qhov khib nyiab kom tshem tawm cov plua plav xoob.
- Yog tias tsim nyog, yaug lub lim hauv qab dej txias. Xyuas kom nws qhuav tag ua ntej reinserting.
- Reassemble the filter and dustbin, then attach to the main unit.
5.3 Ntxuav Cov Txhuam Txhuam
Tshawb xyuas lub txhuam uas muaj lub cav tsis tu ncua seb puas muaj cov plaub hau lossis cov khib nyiab uas sib xyaws ua ke.
- Ensure the vacuum cleaner is turned off and disconnected from the charging station.
- Detach the main brush head from the vacuum tube.
- Locate the release mechanism for the brush roll (refer to diagrams in the full manual if needed).
- Tshem tawm cov txhuam dov thiab ua tib zoo txiav cov plaub hau lossis cov fibers uas sib xyaw ua ke siv txiab.
- Reinsert lub txhuam yob thiab ruaj ntseg rau hauv qhov chaw.
6. Kev daws teeb meem
If you encounter issues with your Princess 339490 Rapido, refer to the following common problems and solutions:
| Teeb meem | Ua Tau | Kev daws |
|---|---|---|
| Lub tshuab nqus tsev tsis qhib | Lub roj teeb tsis them lossis tsis raug teeb tsa zoo. | Ensure battery is fully charged and correctly inserted. Check charging station connection. |
| Tsawg suction zog | Dustbin full, filter clogged, or blockage in the tube/brush head. | Empty dustbin. Clean HEPA filter. Check for and remove any blockages in the tube or brush head. |
| Txhuam yob tsis spinning | Hair or debris tangled in the brush roll, or brush head not properly attached. | Clean the brush roll of any obstructions. Ensure the brush head is securely attached to the tube. |
| Lub sijhawm luv roj teeb | Battery not fully charged or battery degradation. | Ensure battery is fully charged (4 hours). If runtime remains significantly reduced, the battery may need replacement. |
7. Cov lus qhia tshwj xeeb
- Qauv nab npawb: 01.339490.01.001
- Lub zog: 130 Watts
- Voltage: 22.2 Volts
- Hom roj teeb: Lithium-ion
- Lub sijhawm roj teeb: Txog li 32 feeb
- Lub sij hawm them nqi: Kwv yees li 4 teev
- Plua plav Capacity: 0.8 litr
- Hom lim: HEPA, Cartridge
- Lub suab nrov: 70 Decibels
- Qhov Loj (L x W x H): 109 x 22 x 23 cm
- Qhov hnyav: 2.6, XNUMX kg
- Tshwj xeeb nta: Cordless, Bagless, Handheld conversion, Motorized brush head
8. Warranty thiab Support
8.1 Warranty Information
The Princess 339490 Rapido Cordless Stick Vacuum Cleaner comes with a 24-lub hlis chaw tsim khoom warranty from the date of purchase. This warranty covers defects in materials and workmanship under normal household use. It does not cover damage resulting from misuse, neglect, accident, alteration, or improper maintenance.
Thov khaws koj cov ntaub ntawv pov thawj ntawm kev yuav khoom rau kev lees paub.
8.2 Kev Pabcuam Cov Neeg Siv Khoom
For technical assistance, warranty claims, or to order replacement parts, please contact Princess customer support:
- Webqhov chaw: www.princesshome.eu/en-gb/service
- Email: support@princesshome.eu
- Xov tooj: Refer to your regional Princess website rau tus xov tooj hu rau hauv zos.