1. Teeb tsa
This section guides you through the initial setup of your Natec ATX NPC-2038 Semi-Tower PC Case, from unpacking to component installation.
1.1 Unpacking
- Carefully open the packaging and remove the PC case.
- Tshawb xyuas lub thawv kom paub seb puas muaj kev puas tsuaj thaum lub sijhawm thauj khoom. Yog tias pom muaj kev puas tsuaj, hu rau koj tus khw muag khoom tam sim ntawd.
- Remove all internal packaging materials and accessories. Keep the packaging for future transport or warranty claims.
1.2 Kev txheeb xyuas cov khoom
Familiarize yourself with the key components and features of your PC case.
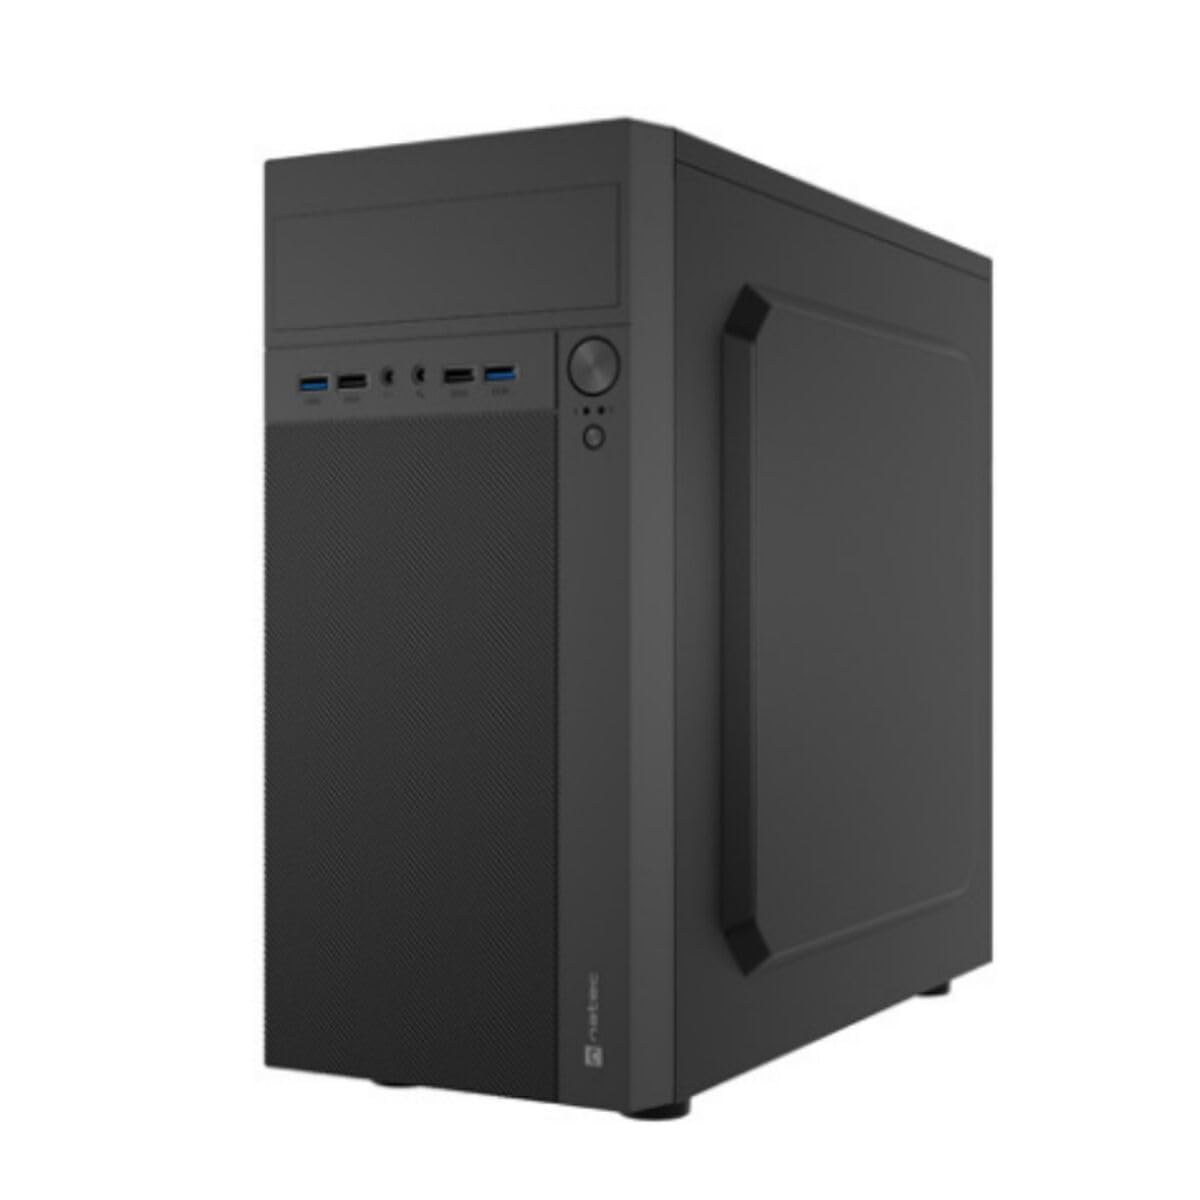
Duab 1: Pem hauv ntej thiab sab view of the Natec ATX NPC-2038 Semi-Tower PC Case, highlighting its compact dimensions. The front panel features USB ports, audio jacks, and power/reset buttons. The case measures approximately 3.9 inches in depth, width, and height, indicating a compact design suitable for various setups.
- Pem hauv ntej vaj huam sib luag: Includes power button, reset button, USB 2.0 ports, USB 3.0 port, and audio input/output jacks.
- Sab Panels: Removable panels for easy access to internal components.
- Vaj Huam Sib Luag Tsheb: Features expansion slots and an opening for the motherboard I/O shield.
- Sab hauv Bays: Provides space for 3.5-inch hard drives and other storage devices.
1.3 Kev teeb tsa
- Npaj Case: Lay the case on its side and remove the side panel(s) by unscrewing the thumb screws at the rear.
- Nruab Motherboard: Secure the Mini ATX motherboard onto the standoffs provided. Ensure all screws are tightened appropriately.
- Install Power Supply: Mount the power supply unit (PSU) in the designated front mount area. Connect the necessary power cables to the motherboard and other components.
- Nruab Cov Drives Cia: Install 3.5-inch hard drives into the internal bays. Secure them with screws.
- Nruab Expansion Cards: Remove the necessary expansion slot covers and install any graphics cards or other expansion cards.
- Txuas Pem Hauv Ntej Vaj Huam Sib Luag Cables: Connect the front panel USB, audio, power, and reset cables to the corresponding headers on your motherboard. Refer to your motherboard manual for specific pin layouts.
- Kev Tswj Xyuas Cable: Route cables neatly to ensure optimal airflow and a clean build.
- Kaw Case: Reattach the side panel(s) and secure them with the thumb screws.
2. Cov lus qhia ua haujlwm
This section details how to power on your system and utilize the front panel connections.
2.1 Fais fab tuag
- Ensure all external peripherals (monitor, keyboard, mouse) are connected.
- Connect the power cable from your power supply unit to a wall outlet.
- Press the power button located on the front panel of the case. The system should initiate startup.
2.2 Pem hauv ntej vaj huam sib luag txuas
The front panel provides convenient access to various ports for your peripherals.
- USB 2.0 Ports (x2): For connecting standard USB devices such as keyboards, mice, and printers.
- Chaw nres nkoj USB 3.0 (x1): For connecting high-speed USB devices like external hard drives or flash drives, offering faster data transfer rates.
- Audio Input (Microphone): Connect your microphone for voice communication.
- Audio Output (Headphones): Connect your headphones or speakers for audio playback.
3. Kev tu
Regular maintenance helps ensure the longevity and optimal performance of your PC components.
3.1 Kev ntxuav
- Sab nrauv: Siv lub mos, damp cloth to wipe down the exterior surfaces of the case. Avoid abrasive cleaners.
- Sab hauv: Qhib lub thawv tsis tu ncua thiab siv cua compressed los tshem tawm cov hmoov av uas sib sau ua ke ntawm cov kiv cua, cov heatsinks, thiab lwm yam khoom. Xyuas kom tseeb tias lub kaw lus raug tua thiab tshem tawm cov ntsaws ua ntej ntxuav sab hauv.
- Plua plav lim: If your case includes dust filters, remove and clean them regularly to maintain good airflow.
3.2 Kev Tswj Xyuas Huab Cua
Proper airflow is crucial for cooling your components. Ensure that the case fans are clean and unobstructed. Consider the direction of airflow (intake vs. exhaust) to optimize cooling efficiency.
4. Kev daws teeb meem
This section addresses common issues you might encounter with your PC case and offers potential solutions.
| Teeb meem | Ua Tau | Kev daws |
|---|---|---|
| Qhov system tsis muaj zog. | Power cable disconnected, PSU switch off, front panel power button not connected correctly. | Check power cable connection, ensure PSU switch is on, verify front panel power cable connection to motherboard. |
| USB ports not functioning. | Front panel USB cables not connected to motherboard. | Ensure USB 2.0 and USB 3.0 headers are correctly connected to the motherboard. |
| Cov qhov (jacks) suab tsis ua haujlwm. | Front panel audio cable not connected to motherboard. | Verify the HD Audio cable is securely connected to the motherboard's audio header. |
| Overheating components. | Poor airflow, dust buildup. | Clean dust filters and internal components. Ensure fans are properly oriented for optimal airflow. |
5. Cov lus qhia tshwj xeeb
Detailed technical specifications for the Natec ATX NPC-2038 Semi-Tower PC Case.
| Feature | Tus nqi |
|---|---|
| Hom | Natec |
| Qauv Lub Npe | HELIX (NPC-2038) |
| Case Hom | Mid Ntauwd |
| Compatibility ntawm motherboard | Mini ATX |
| Xim | multicoloured (Black) |
| Khoom siv | Legierter Stahl (Alloy hlau) |
| Fais Fab Mounting Hom | Pem Hauv Ntej |
| Txoj kev txias | Cua |
| Ntxuam Size | 120 hli |
| Tus naj npawb ntawm Cov kiv cua | 1 (pre-installed, if applicable) |
| Total Expansion Slots Quantity | 4 |
| Total USB 2.0 Ports | 2 |
| Total USB 3.0 Ports | 1 |
| Internal Bays Quantity | 3 (for 3.5 Inches Hard Disk Form Factor) |
| Yam Nyhav | 1 kg ib |
| Yam khoom Dimensions (D x W x H) | 3.94"D x 3.94"W x 3.94"H (Approximate, based on provided data) |
| Pom zoo siv rau cov khoom | General-Purpose Computing |
6. Warranty Information
Natec products are manufactured to high-quality standards. This product is covered by a manufacturer's warranty against defects in materials and workmanship. The specific duration and terms of the warranty may vary by region and retailer. Please retain your proof of purchase for warranty claims. For detailed warranty information, refer to the documentation provided with your purchase or visit the official Natec webqhov chaw.
7. Txhawb nqa
If you encounter any issues not covered in this manual or require further assistance, please contact Natec customer support or your retailer. You can typically find contact information on the official Natec website los yog ntawm koj cov khoom ntim.
- Kev them nyiaj yug hauv internet: Visit the official Natec website rau FAQs, tsav tsheb, thiab kev pab txhawb nqa.
- Contact Retailer: For purchase-related issues or initial troubleshooting, your retailer may be able to provide immediate assistance.