1. Cov ntaub ntawv tseem ceeb ntawm kev nyab xeeb
Please read all instructions carefully before using the EVTSCAN Projection Clock. Keep this manual for future reference.
- Tsis txhob tso lub cuab yeej rau qhov kub thiab txias, ncaj qha tshav ntuj, lossis cov av noo siab.
- Tsis txhob poob los yog ua rau lub moos raug kev cuam tshuam loj heev.
- Tsis txhob sim disassemble lossis kho lub cuab yeej koj tus kheej. Hu rau cov neeg ua haujlwm tsim nyog.
- Use only the specified power adapter (DC 5.0V, 1.2A) or appropriate batteries (2xAAA, not included).
- Khaws kom deb ntawm cov menyuam yaus.
2. Khoom Tshajview
The EVTSCAN Projection Clock is a versatile digital alarm clock featuring a 3-inch backlit LCD screen that displays time, date, day of the week, temperature, and humidity. It includes a projection function to display time and temperature on a wall or ceiling, dual alarms with snooze, and a USB port for charging mobile phones.
Cov yam ntxwv tseem ceeb:
- 12/24-hour time format display.
- Date and day of the week display (7 languages for week).
- Temperature detection (-9℃ to +50℃) and humidity detection (20% to 95%).
- Projection function with 180-degree rotation for time and temperature.
- Dual alarm clocks with slowly increasing ntim.
- 5-minute snooze function.
- USB them chaw nres nkoj rau mobile pab kiag li lawm.
- Adjustable backlight with 4 levels (high, medium, low, off).

Daim duab 2.1: Pem hauv ntej view of the EVTSCAN Projection Clock, showing the LCD display and projection lens.
3. Cov ntsiab lus ntawm pob
Thaum unpacking, thov xyuas kom meej tias tag nrho cov khoom teev hauv qab no muaj nyob thiab zoo:
- 1 x EVTSCAN Projection Clock
- 1 x USB Cable
- 1 x English User Manual
Note: 2xAAA batteries are required for battery power and are not included in the package.
4. Teeb tsa
4.1 Fais fab lub cuab yeej
The EVTSCAN Projection Clock can be powered by either AAA batteries or via the included USB cable.
4.1.1 Kev teeb tsa roj teeb
- Nrhiav lub roj teeb lub hau npog rau hauv qab ntawm lub moos.
- Slide open the cover.
- Ntxig ob (2) lub roj teeb AAA, xyuas kom meej tias polarity raug (+/-).
- Kaw lub roj teeb lub hau npog kom ruaj ntseg.
Note: When powered by batteries, the backlight will only light up for 8 seconds when activated to conserve power. The projection lamp will also light up for 8 seconds.
4.1.2 USB Power Connection
- Connect the small end of the provided USB cable to the DC 5.0V 1.2A input port on the back of the clock.
- Connect the larger end of the USB cable to a compatible USB power adapter (not included) or a powered USB port.
Note: When powered by USB, the backlight and projection lamp can remain continuously on, with adjustable brightness for the backlight.
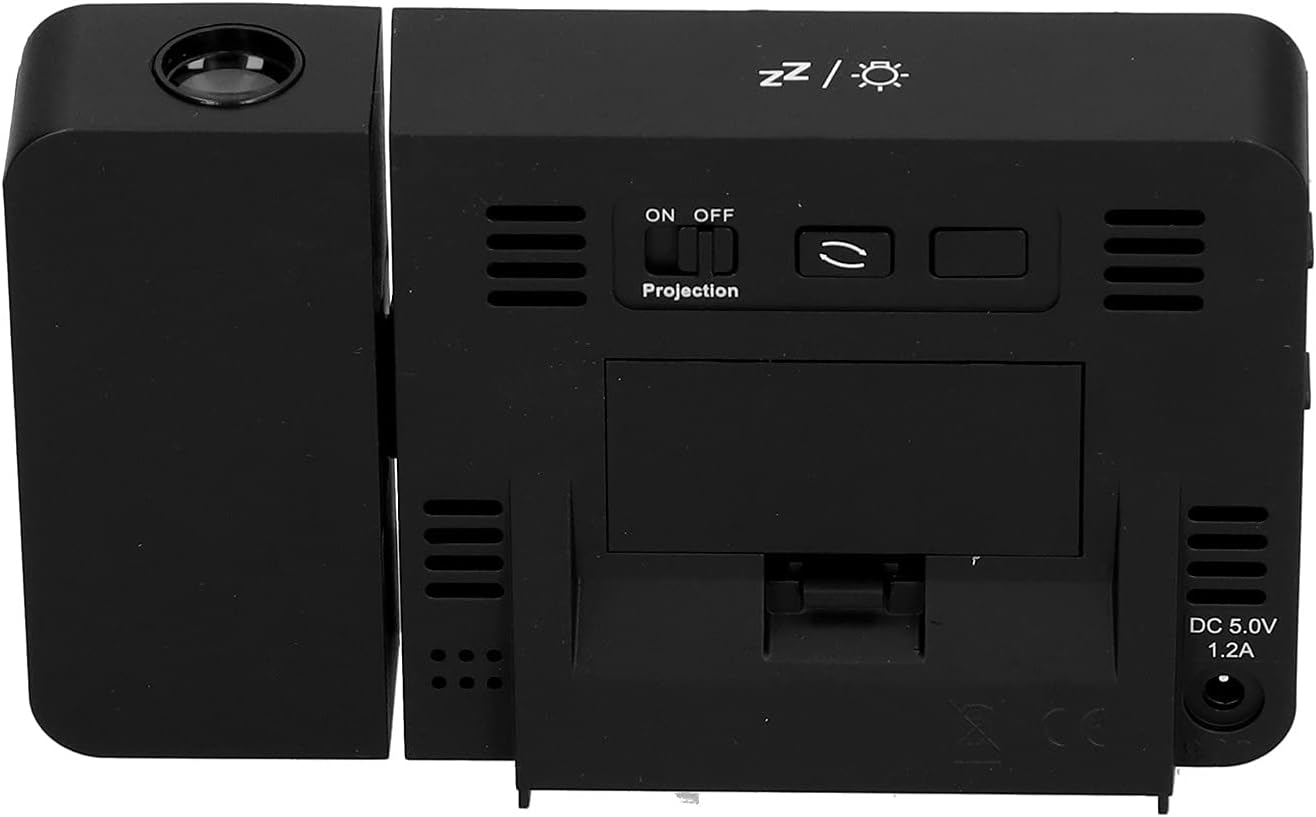
Daim duab 4.1: Qab view of the clock, indicating the battery compartment and DC 5.0V 1.2A power input.
5. Cov lus qhia ua haujlwm
5.1 Khawm Ua Haujlwm
Familiarize yourself with the control buttons located on the front and sides of the clock:
- Sijhawm: Nkag mus rau hom teeb tsa sijhawm.
- QHIA: Nkag mus rau hom teeb tsa lub tswb ceeb toom.
- +: Increases values, switches 12/24HR format, adjusts backlight.
- -: Decreases values, switches temperature units (℃/℉).
- Kev Hloov Pauv Qhib/Tawm ntawm Qhov Projection: Activates or deactivates the projection. (Located on the back/side)
- Alarm 1 ON/OFF Switch: Activates or deactivates Alarm 1. (Located on the side)
- Alarm 2 ON/OFF Switch: Activates or deactivates Alarm 2. (Located on the side)
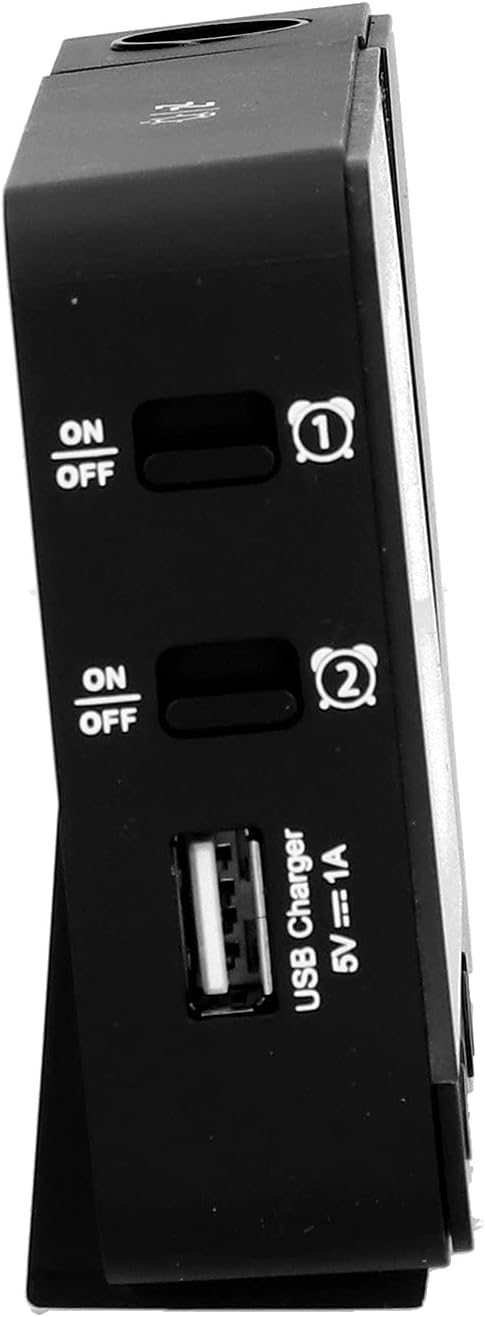
Daim duab 5.1: Sab view showing Alarm 1 and Alarm 2 ON/OFF switches, and the USB charging port.
5.2 Teem Sijhawm thiab Hnub Tim
- Nias thiab tuav lub LUB SIJ HAWM button to enter time setting mode. The hour display will flash.
- Siv cov + or - nyees khawm los kho lub sij hawm.
- Xovxwm LUB SIJ HAWM again to confirm the hour and move to minute setting. Adjust with + or -.
- Txuas ntxiv nias LUB SIJ HAWM to cycle through setting year, month, and day. Adjust each with + or -.
- After setting the day, press LUB SIJ HAWM ib lub sij hawm dhau los tawm ntawm kev teeb tsa hom.
- Txhawm rau hloov ntawm 12-teev thiab 24-teev hom ntawv, nias lub + button during normal time display.
- To switch between Celsius (℃) and Fahrenheit (℉) for temperature, press the - button during normal time display.
5.3 Teem lub tswb
The clock features two independent alarms (Alarm 1 and Alarm 2).
- Nias thiab tuav lub Tswb button to enter Alarm 1 setting mode. The Alarm 1 hour display will flash.
- Siv cov + or - nyees khawm los kho lub tswb moos.
- Xovxwm Tswb again to confirm the hour and move to Alarm 1 minute setting. Adjust with + or -.
- Xovxwm Tswb again to move to Alarm 2 hour setting, and repeat the process for Alarm 2.
- After setting Alarm 2 minutes, press Tswb ib lub sij hawm dhau los tawm ntawm kev teeb tsa hom.
- To activate or deactivate an alarm, use the corresponding Tswb 1 ON/OFF or Tswb 2 ON/OFF switch on the side of the clock. An alarm icon will appear on the display when active.
5.3.1 Qhib Ua Haujlwm
When an alarm sounds, press any button (except the alarm ON/OFF switch) to activate the 5-minute snooze function. The alarm will sound again after 5 minutes. To turn off the alarm completely, slide the corresponding alarm ON/OFF switch to OFF.
5.4 Projection Function
The clock can project the time and temperature onto a wall or ceiling.
- Nrhiav qhov Projection ON/OFF switch on the back of the clock. Slide it to ON to activate the projection.
- Adjust the angle of the projection arm (the part with the lens) to direct the projection as desired. The arm can rotate nearly 180 degrees.
- The projection will display the current time and temperature in a soft red color.

Daim duab 5.2: Sab view showing the projection arm extended and ready for use.

Daim duab 5.3: The clock projecting time and temperature onto a wall in a bedroom setting.
5.5 Backlight Kho
When the clock is powered by USB, the backlight can be adjusted to four levels: high, medium, low, or off. Repeatedly press the + button during normal time display to cycle through the brightness levels.
When powered by batteries, the backlight will illuminate for 8 seconds when any button is pressed, then turn off to conserve power.
5.6 USB them chaw nres nkoj
The clock features a USB charging port (5V=1A) on its side. You can use this port to charge your mobile phone or other small electronic devices while the clock is connected to USB power.
Note: The USB charging port only functions when the clock is powered via the USB cable. It does not work when the clock is running on battery power.
6. Kev tu
6.1 Kev ntxuav
- Siv daim ntaub mos mos thiab qhuav los so lub moos.
- Do not use abrasive cleaners, solvents, or chemical sprays, as these may damage the finish or electronic components.
- Keep the projection lens clean for clear projection. Use a soft, lint-free cloth.
6.2 Hloov roj teeb
When the display becomes dim or the clock functions erratically while on battery power, it's time to replace the AAA batteries. Refer to Section 4.1.1 for battery installation instructions. Always replace both batteries at the same time with new ones.
7. Kev daws teeb meem
| Teeb meem | Ua Tau | Kev daws |
|---|---|---|
| Lub moos zaub yog dawb los yog dim. | No power, low batteries, or USB cable not connected. | Check battery installation and replace if necessary. Ensure USB cable is securely connected to a power source. |
| Projection is unclear or not visible. | Projection switch is OFF, lens is dirty, or projection distance is too far/close. | Ensure Projection switch is ON. Clean the projection lens. Adjust the clock's distance from the projection surface. |
| Tswb tsis suab. | Alarm is not set or is deactivated. | Verify alarm time is set correctly. Ensure the corresponding Alarm ON/OFF switch is in the ON position. |
| USB charging port tsis ua haujlwm. | Clock is running on battery power, or USB cable is not connected to a power source. | Ensure the clock is powered via the USB cable and connected to a functional power adapter. |
| Lub sijhawm/hnub tim tsis raug. | Lub sijhawm/hnub tim tsis tau teeb tsa kom raug. | Refer to Section 5.2 to reset the time and date. |
8. Cov lus qhia tshwj xeeb
| Qauv: | B0CLGDFCGX |
| Hom Tshuaj: | EVTSCAN |
| Khoom siv: | ABS (Acrylonitrile Butadiene Styrene) |
| Khoom Dimensions: | Kwv yees li. 13.5 x 8 x 2.5 cm (5.3 x 3.1 x 1.0 nti) |
| Qhov hnyav: | Kwv yees li. 242g (8.5 ooj) |
| Hom Zaub: | Cov LCD nrog Backlight |
| Lub zog Source: | 2xAAA batteries (not included) or DC 5.0V 1.2A via USB cable |
| USB them rau cov zis: | 5V = 1A |
| Temperature Detection Range: | -9℃ to +50℃ (1℃ resolution) |
| Humidity Detection Range: | 20% to 95% (1% resolution) |
| Temperature/Humidity Calibration Time: | 30 vib nas this |
| Backlight Levels: | 4 levels (High, Medium, Low, Off) when USB powered; 8s illumination when battery powered. |
| Qhov projection L.amp: | Always on when USB powered; 8s illumination when battery powered. |

Daim duab 8.1: Product dimensions: 5.3 inches wide by 3.1 inches high.
9. Warranty thiab Support
EVTSCAN products are manufactured to high quality standards. For specific warranty information, please refer to the warranty card included with your purchase or contact your retailer.
If you encounter any issues or have questions regarding your EVTSCAN Projection Clock, please contact the seller or EVTSCAN customer support for assistance. Please have your model number (B0CLGDFCGX) ready when contacting support.
Yog xav tau kev pab ntxiv, koj tuaj yeem mus saib tau EVTSCAN Store on Amazon.