1. Taw qhia
This manual provides essential instructions for the installation, operation, and maintenance of your MAXSafes Quick Access Wall Safe, Model 50002NV. This wall-mounted safe is designed to secure valuables using advanced finger vein recognition, a numeric keypad, or a traditional key. Please read this manual thoroughly before installation and use to ensure proper function and safety.
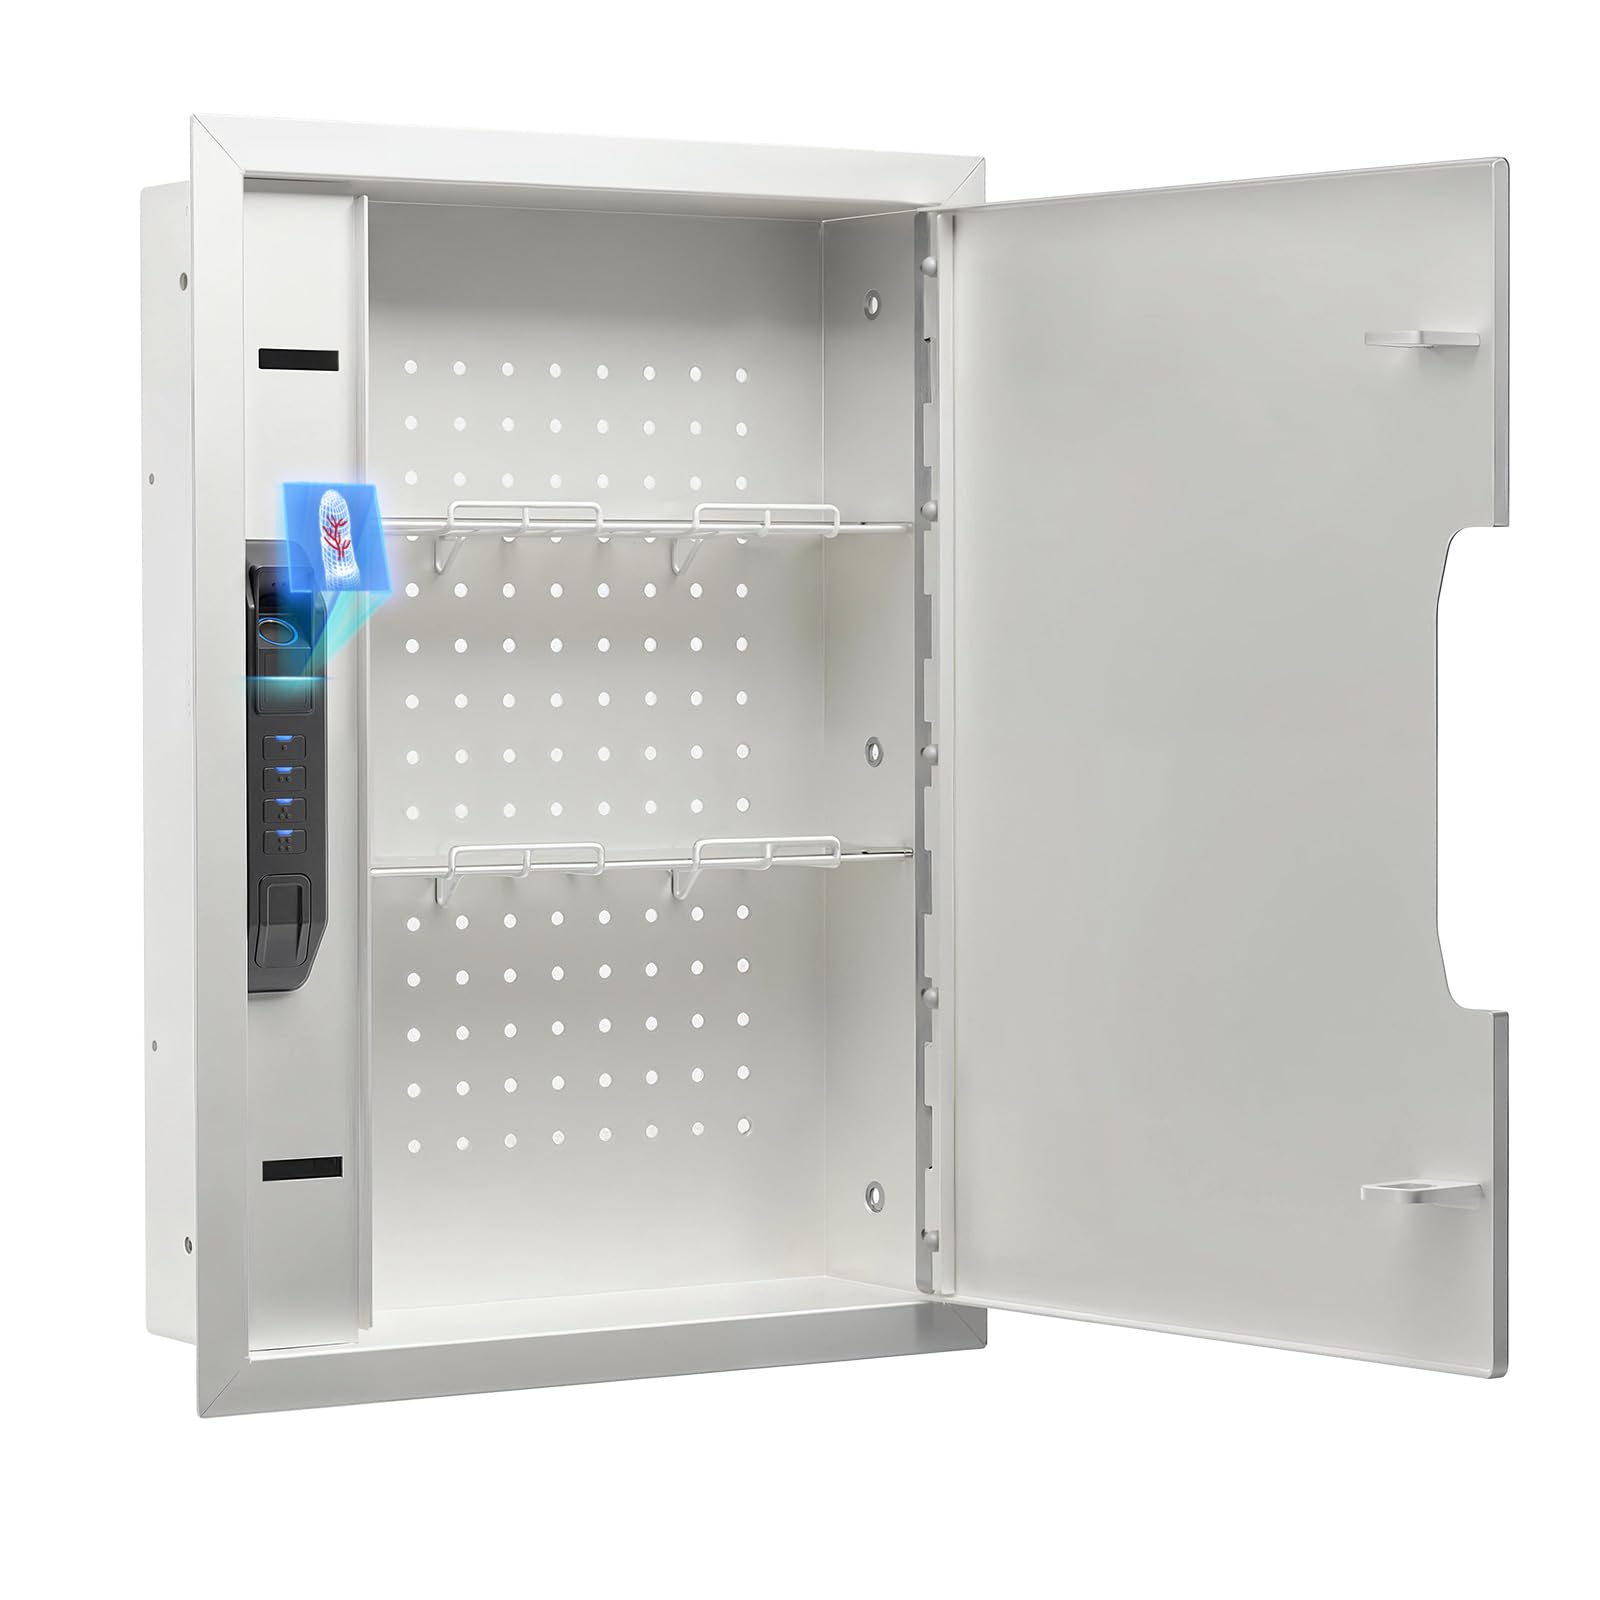
Figure 1: MAXSafes Quick Access Wall Safe (Model 50002NV)
2. Khoom Nta
- Finger Vein Recognition Lock: Utilizes unique blood vessel texture for high-security, unforgeable access. Stores up to 50 finger vein IDs, unaffected by external factors like oil, dryness, or humidity.
- Three Ways to Open: Offers versatile access via finger vein recognition, numeric keypad (4-6 digit code), or physical key.
- Heavy Duty Dual-Latch: All locking mechanisms are positioned on one side of the door to maximize interior storage space.
- Removable Shelves & Pegboard: Includes pre-drilled holes (DIY Pegboard) and adjustable, removable shelves for customized organization.
- Built-in Light & Silent Mode: Features internal LED lighting for visibility in low-light conditions and a silent mode (activated by pressing and holding the "1" key) to disable keypad sounds.
- Tswb System: Activates a 120-second alarm after three incorrect entry attempts. The alarm can be deactivated by using the key, removing the battery, or entering the correct finger vein/passcode.

Figure 2: Finger Vein Recognition in Use
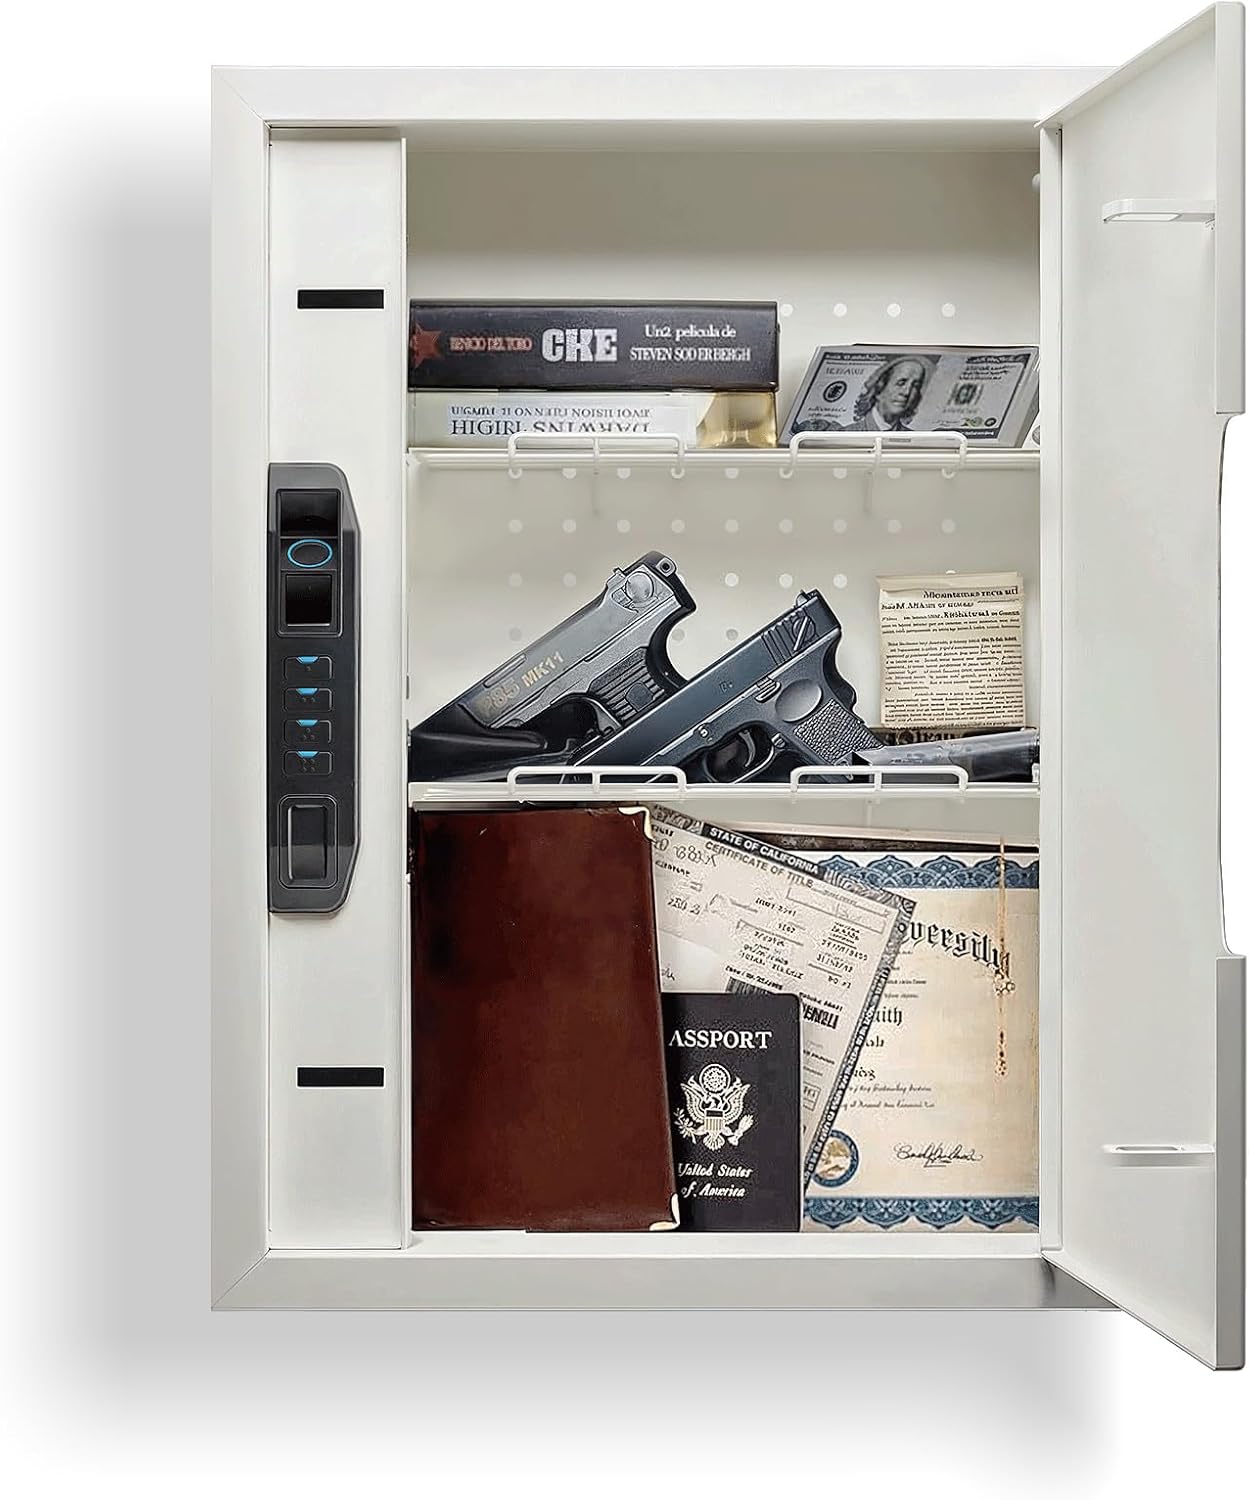
Figure 3: Safe Interior with Removable Shelves and Pegboard
3. Cov ntsiab lus ntawm pob
Xyuas kom tseeb tias txhua yam khoom muaj nyob hauv koj pob:
- 1 x MAXSafes Wall Safe
- 1 x Phau Ntawv Qhia
- 2 x Override Keys
4. Cov ntaub ntawv kev nyab xeeb
- Always store override keys in a secure location away from the safe and out of reach of unauthorized individuals.
- Do not store the override keys inside the safe.
- Ensure the safe is securely mounted to wall studs to prevent unauthorized removal.
- Keep the safe door closed and locked when not in use.
- Regularly check battery levels to ensure continuous operation of electronic locking mechanisms.
5. Kev teeb tsa thiab kev teeb tsa
Proper installation is crucial for the security of your wall safe. It is recommended to install the safe between standard 16-inch on-center wall studs.
5.1 Daim Video Qhia Txog Kev Teeb Tsa
Video 1: Official MAXSafes guide on how to install the wall safe. This video demonstrates locating wall studs, cutting the drywall, placing the safe, marking and drilling holes, and securing the safe to the studs.
5.2 Step-by-Step Installation
- Xaiv qhov chaw: Select a suitable location between two wall studs. Ensure there are no electrical wires, plumbing, or other obstructions behind the drywall.
- Ntsuas thiab Mark: Use the safe's dimensions (refer to Specifications) to mark the rectangular opening on the drywall.
- Cut Drywall: Carefully cut out the marked rectangular section of the drywall using a drywall saw.
- Test Fit: Insert the safe into the opening to ensure it fits correctly.
- Mark Mounting Qhov: Open the safe door to access the pre-drilled mounting holes on the interior sides. Use a pencil to mark these locations on the wall studs.
- Remove Safe & Drill Pilot Holes: Remove the safe from the wall. Using a 1/4-inch drill bit, drill pilot holes at the marked locations on the wall studs.
- Insert Safe & Secure: Re-insert the safe into the wall opening. Align the mounting holes with the pilot holes. Use the provided bolts and a socket wrench to securely fasten the safe to the wall studs. Tighten firmly but do not overtighten to avoid damaging the wall or safe.

Figure 4: Internal Components and Dimensions for Installation

Figure 5: Installed Wall Safe
6. Kev ua haujlwm
6.1 Daim Ntawv Qhia Txog Kev Ua Haujlwm
Video 2: Official MAXSafes guide on how to use the wall safe. This video covers initial setup, programming finger vein IDs, programming access codes, and understanding the alarm mode.
6.2 Kev teeb tsa thawj zaug
- Ntxig roj teeb: Open the safe using an override key. Locate the battery compartment inside the safe. Remove the battery cover and insert a new 9V battery (not included).
- Store Override Keys: Keep the override keys in a secure location outside of the safe for emergency access.
6.3 Programming Finger Vein IDs
The safe can store up to 50 unique finger vein IDs.
- Access Program Button: Open the safe using an override key or the default access code. Locate the program button inside the safe (usually under a rubber cover). Press the program button.
- Register Finger Vein: Place your finger on the scanner. The scanner will prompt you to lift and place your finger three times to register your finger vein ID.
- Repeat for Additional Users: Repeat the process for any additional finger vein IDs you wish to register.
6.4 Nwsasing All Finger Vein IDs
To erase all stored finger vein IDs:
- Access Program Button: Open the safe and press the program button.
- lwv: Press and hold the program button for 5 seconds, then press the '4' key on the keypad. All registered finger vein IDs will be erased.
6.5 Programming Numeric Combinations
The safe can store one 4-6 digit numeric code at a time.
- Access Program Button: Open the safe and press the program button.
- Enter New Code: Sau koj tus lej 4-6 tus lej uas koj xav tau ntawm lub keyboard.
- Paub meej tus lej: Press the program button again to confirm and save the new code. Repeat the process to re-enter the code for verification.

Figure 6: Multiple Access Methods
6.6 Key Override
In case of battery failure or forgotten codes, the safe can be opened using the physical override keys. Locate the hidden keyhole, remove its magnetic cover, insert the key, and turn to open.
6.7 Silent Mode
To enable or disable silent mode (which mutes keypad sounds), press and hold the "1" key on the keypad.
6.8 Tswb System
If three incorrect finger vein or numeric code entries are made consecutively, the safe's alarm system will activate for 120 seconds. During this time, the safe will also enter a 2-minute lockout period, preventing further attempts.
To stop the alarm and end the lockout:
- Enter a correct finger vein ID or numeric passcode.
- Use an override key to open the safe.
- Remove the 9V battery.

Figure 7: Safe with Interior LED Lighting
7. Kev tu
- Hloov roj teeb: Replace the 9V battery annually or when the low battery indicator activates.
- Ntxuav: Wipe the exterior and interior of the safe with a soft, dry cloth. Avoid using abrasive cleaners or solvents.
- Lock Mechanism: Do not lubricate the lock mechanism. If the lock becomes stiff, contact customer support.
8. Kev daws teeb meem
| Teeb meem | Ua Tau | Kev daws |
|---|---|---|
| Safe does not open with finger vein or code. | Low battery; incorrect finger vein/code; finger not placed correctly. | Replace 9V battery; re-register finger vein; re-enter code; ensure finger covers scanner completely. Use override key if necessary. |
| Lub tswb ceeb toom suab tsis tau xav txog. | Three incorrect entries; tampering attempt. | Enter correct finger vein/code; use override key; remove battery to reset. |
| Keypad tsis teb. | Dead battery; electronic malfunction. | Replace 9V battery. If issue persists, use override key and contact customer support. |
| Qhov rooj tsis kaw los yog latch kom raug. | Obstruction; latch mechanism issue. | Check for obstructions. Ensure safe is installed level. If mechanism is faulty, contact customer support. |
9. Cov lus qhia tshwj xeeb
| Feature | Paub meej |
|---|---|
| Hom | MAXSafes |
| Qauv nab npawb | 50002 XNUMXnv |
| Khoom Dimensions (D x W x H) | 4" H x 16.13" W x 21.88" H |
| Hom xauv | Biometric (Finger Vein), Electronic Combination Lock, Key |
| Muaj peev xwm | 1.31 kub |
| Khoom siv | Carbon Steel |
| Mounting Hom | Wall Mount (between studs) |
| Tshwj xeeb nta | Alarm System, Biometric Finger Vein, Combination Lock, Removable Shelf, Pegboard |
| UPC | 762736659692 |
10. Warranty thiab Support
For warranty information or technical support, please refer to the contact details provided with your purchase documentation or visit the official MAXSafes webqhov chaw. Khaws koj daim ntawv yuav khoom ua pov thawj ntawm kev yuav khoom rau kev lees paub.