kavey XIN-KM-65
Kavey 6.0 Cu. Ft. Digital Keypad Safe Box (Model XIN-KM-65) - Instruction Manual
Comprehensive instruction manual for the Kavey 6.0 Cubic Feet Digital Keypad Safe Box, Model XIN-KM-65. Learn about setup, operation, features, and maintenance for your safe.
1. Khoom Tshajview
The Kavey 6.0 Cubic Feet Safe Box is designed to secure your valuables with advanced features including a digital keypad, dual alarm system, and robust construction. This manual provides detailed instructions for installation, operation, and maintenance.
Cov yam ntxwv tseem ceeb:
- Loj Muaj Peev Xwm: 6.0 cubic feet with a double-door design for organized storage.
- Advanced Security: Digital keypad with 3D glowing buttons, dual alarm system (70dB), and five solid live bolts.
- Kev tsim kho ruaj khov: Reinforced low carbon alloy steel with laser-cut precision for anti-prying and anti-drilling resistance.
- Yooj yim nta: Internal LED lights, mute function, deposit slot, and emergency power jack.
- Kev Tiv Thaiv Sab Hauv: Soft lining and flannel decoration to prevent scratches to valuables.

2. Cov ntsiab lus ntawm pob
Thov xyuas kom meej tias txhua yam khoom teev hauv qab no suav nrog hauv koj pob:
- 1 x Kavey 6.0 Cubic Feet Safe Box
- 4 x Emergency Keys
- 6 x Expansion Screws
- 1 x USB Hom-C Cable
- 4 x Non-slip Pads
- 1 x User Manual (cov ntaub ntawv no)
3. Kev teeb tsa thiab kev teeb tsa
3.1 Unpacking
Carefully remove the safe from its packaging. Inspect the safe for any signs of damage. Retain packaging materials for future transport if needed.
3.2 Mounting Safe
The Kavey safe is designed for secure mounting to a wall or floor to prevent unauthorized removal. It features pre-drilled holes for easy installation.
- Choose a suitable location for the safe, such as a wall or floor, ensuring it is a stable surface.
- Position the safe and mark the locations for the pre-drilled holes on the mounting surface.
- Drill pilot holes into the marked locations using an appropriate drill bit for your wall/floor material.
- Align the safe's pre-drilled holes with the pilot holes.
- Insert the provided expansion screws through the safe's holes and into the mounting surface.
- Tighten the screws securely to firmly anchor the safe.

3.3 Installing Non-slip Pads
Attach the four non-slip pads to the bottom of the safe to prevent scratching surfaces and provide stability if not mounted.
4. Cov lus qhia ua haujlwm
4.1 Qhib Thawj Zaug (Siv Tus Yuam Sij Thaum Muaj Xwm Ceev)
Upon first use, or if the batteries are depleted, you will need to use the emergency key.
- Locate the hidden keyhole cover on the digital keypad.
- Insert an emergency key into the keyhole.
- Turn the key clockwise while simultaneously turning the knob clockwise to open the safe door.

4.2 Txhim Kho Cov Roj Teeb
The digital keypad requires batteries (not included). Open the safe using the emergency key, then locate the battery compartment on the inside of the door. Insert the required batteries, ensuring correct polarity.
4.3 Setting/Changing the Digital Password
With the safe door open:
- Press the internal reset button (usually a small red button on the inside of the door). The indicator light on the keypad will illuminate.
- Enter your desired password (typically 3-8 digits) on the digital keypad.
- Press the "#" button to confirm. The indicator light will flash, confirming the new password is set.
- Test the new password with the door open before closing it.
4.4 Opening with Digital Password
- Enter your programmed password on the digital keypad.
- Press the "#" button to confirm.
- Tsis pub dhau 5 vib nas this, tig lub pob qhov rooj mus qhib lub qhov rooj nyab xeeb.

4.5 Opening with USB Type-C External Power
If the internal batteries are depleted and you do not have the emergency key, you can use the USB Type-C cable for external power.
- Connect the provided USB Type-C cable to the external power jack on the keypad.
- Connect the other end of the USB cable to a power source (e.g., power bank, USB wall adapter).
- Once powered, enter your digital password and press "#".
- Turn the knob clockwise to open the safe door.
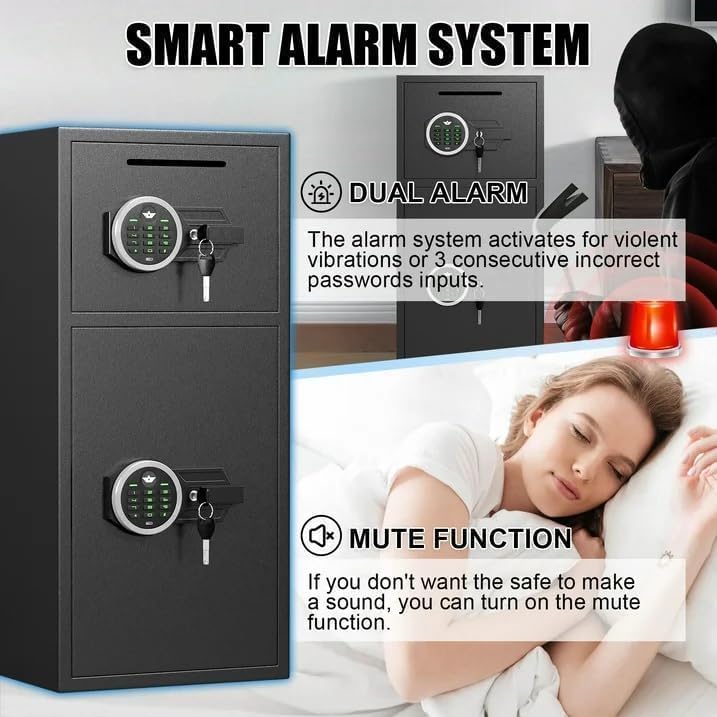
4.6 Mute Function
To activate or deactivate the mute function, press the "*" button on the keypad. This will silence keypad beeps and alarm sounds for discreet operation.
4.7 Dual Alarm System
The safe is equipped with a dual alarm system that activates under specific conditions:
- Tus password tsis raug: If three consecutive incorrect passwords are entered, the alarm will sound for a set duration (e.g., 60 seconds).
- Violent Vibration: If the safe detects violent vibrations or tampering, the alarm will activate.
The alarm sound level is approximately 70 decibels. To silence the alarm, enter the correct password or use an emergency key.
4.8 Internal LED Lights
The safe features internal LED lights to illuminate the contents. These lights typically activate automatically when the door is opened and turn off when closed.
4.9 Siv Qhov Chaw Tso Nyiaj
The front deposit slot allows for easy insertion of money or coins without needing to open the main safe door.
5. Kev tu
5.1 Hloov roj teeb
Replace batteries promptly when the low battery indicator appears on the keypad to ensure continuous operation. Use the emergency key or external power if batteries are fully depleted.
5.2 Kev ntxuav
Ntxuav sab nraud ntawm lub thawv nyab xeeb nrog ib daim mos mos, damp cloth. Avoid abrasive cleaners or solvents that could damage the finish. Do not spray cleaning solutions directly onto the keypad.
5.3 Key Storage
Store emergency keys in a secure location away from the safe and not inside it. This ensures access in case of forgotten passwords or battery failure.
6. Kev daws teeb meem
- Safe does not open with password:
- Ensure batteries are not depleted. Use external USB Type-C power or emergency key.
- Re-enter the password carefully.
- If the password is forgotten, use the emergency key to open and reset the password.
- Cov keyboard tsis teb:
- Xyuas cov roj teeb theem thiab hloov yog tias tsim nyog.
- Use the USB Type-C external power cable to provide temporary power.
- Lub tswb ceeb toom tsis xav txog:
- This indicates either three incorrect password attempts or detection of violent vibration.
- Enter the correct password or use the emergency key to silence the alarm.
- If the mute function is desired, activate it by pressing the "*" button.
- Safe door feels loose after mounting:
- Ensure all expansion screws are tightened securely.
- Verify the mounting surface is stable and appropriate for the safe's weight.
7. Cov lus qhia tshwj xeeb
| Feature | Paub meej |
|---|---|
| Hom | Kavey |
| Qauv nab npawb | XIN-KM-65 |
| Khoom Dimensions (D x W x H) | 13.8" H x 13.8" W x 25.5" H |
| Muaj peev xwm | 6.0 kub |
| Hom xauv | Electronic Combination Xauv |
| Khoom siv | Reinforced Low Carbon Alloy Steel |
| Yam Nyhav | 39.5 puj |
| Mounting Hom | Under Counter Mount (Wall/Floor Mountable) |
| Dej Resistance Level | Tsis Water Resistant |
| Yuav tsum tau roj teeb | Yog (Tsis suav) |
| Tshwj xeeb nta | Combination Lock, Mute Function, Dual Alarm, Internal LED Lights, Deposit Slot |
Note: While the product title includes "Waterproof", the detailed specifications indicate "Not Water Resistant". Please consider this for placement and protection of contents.
8. Warranty thiab Customer Support
Kavey is committed to providing high-quality products and excellent customer service.
- Lub neej Warranty: The product comes with a lifetime warranty.
- 90-Day Unconditional Returns: Enjoy a 90-day period for unconditional returns.
- Lifetime Key Matching Service: Kavey offers a lifetime service for key matching.
- 24-Hour Online Customer Service: For any issues or inquiries, customer service is available 24/7.
Hu rau Cov Neeg Siv Khoom:
If you encounter any problems with your safe, please contact Kavey customer service directly. Our experienced team will respond within 24 hours to resolve your issue.
To find the seller on Amazon:
- Log in to your Amazon buyer's account.
- Find your order for the Kavey safe.
- Click "Get help" to contact the seller.
