1. Taw qhia
The NGTeco NG-MB1 4-in-1 APP-Based Time Clock is a versatile attendance management system designed for small businesses. It offers multiple verification methods including facial recognition, fingerprint scanning, RFID card, and PIN entry to accurately track employee work hours. This manual provides detailed instructions for setting up, operating, maintaining, and troubleshooting your device.
2. Cov ntaub ntawv kev nyab xeeb
- Ensure the device is installed indoors and away from direct sunlight, heat sources, and moisture.
- Tsuas yog siv lub hwj chim adapter los tiv thaiv kev puas tsuaj.
- Tsis txhob sim disassemble lossis kho lub cuab yeej koj tus kheej. Hu rau cov neeg siv khoom txhawb nqa rau kev pab.
- Khaws lub cuab yeej kom huv si thiab tsis muaj plua plav thiab khib nyiab.
3. Cov ntsiab lus ntawm pob
Xyuas kom tseeb tias txhua yam khoom muaj nyob hauv pob:
- NGTeco NG-MB1 Time Clock Unit
- Fais fab Adapter
- Phab Ntsa Mounting Bracket
- Mounting Hardware (screws, anchors)
- RFID Cards (multiple)
- USB Drive (for data transfer)
- Phau Ntawv Qhia Pib Ceev
- Contact Information Card
4. Khoom Tshajview
The NGTeco NG-MB1 Time Clock features a compact design with multiple input options for employee verification.
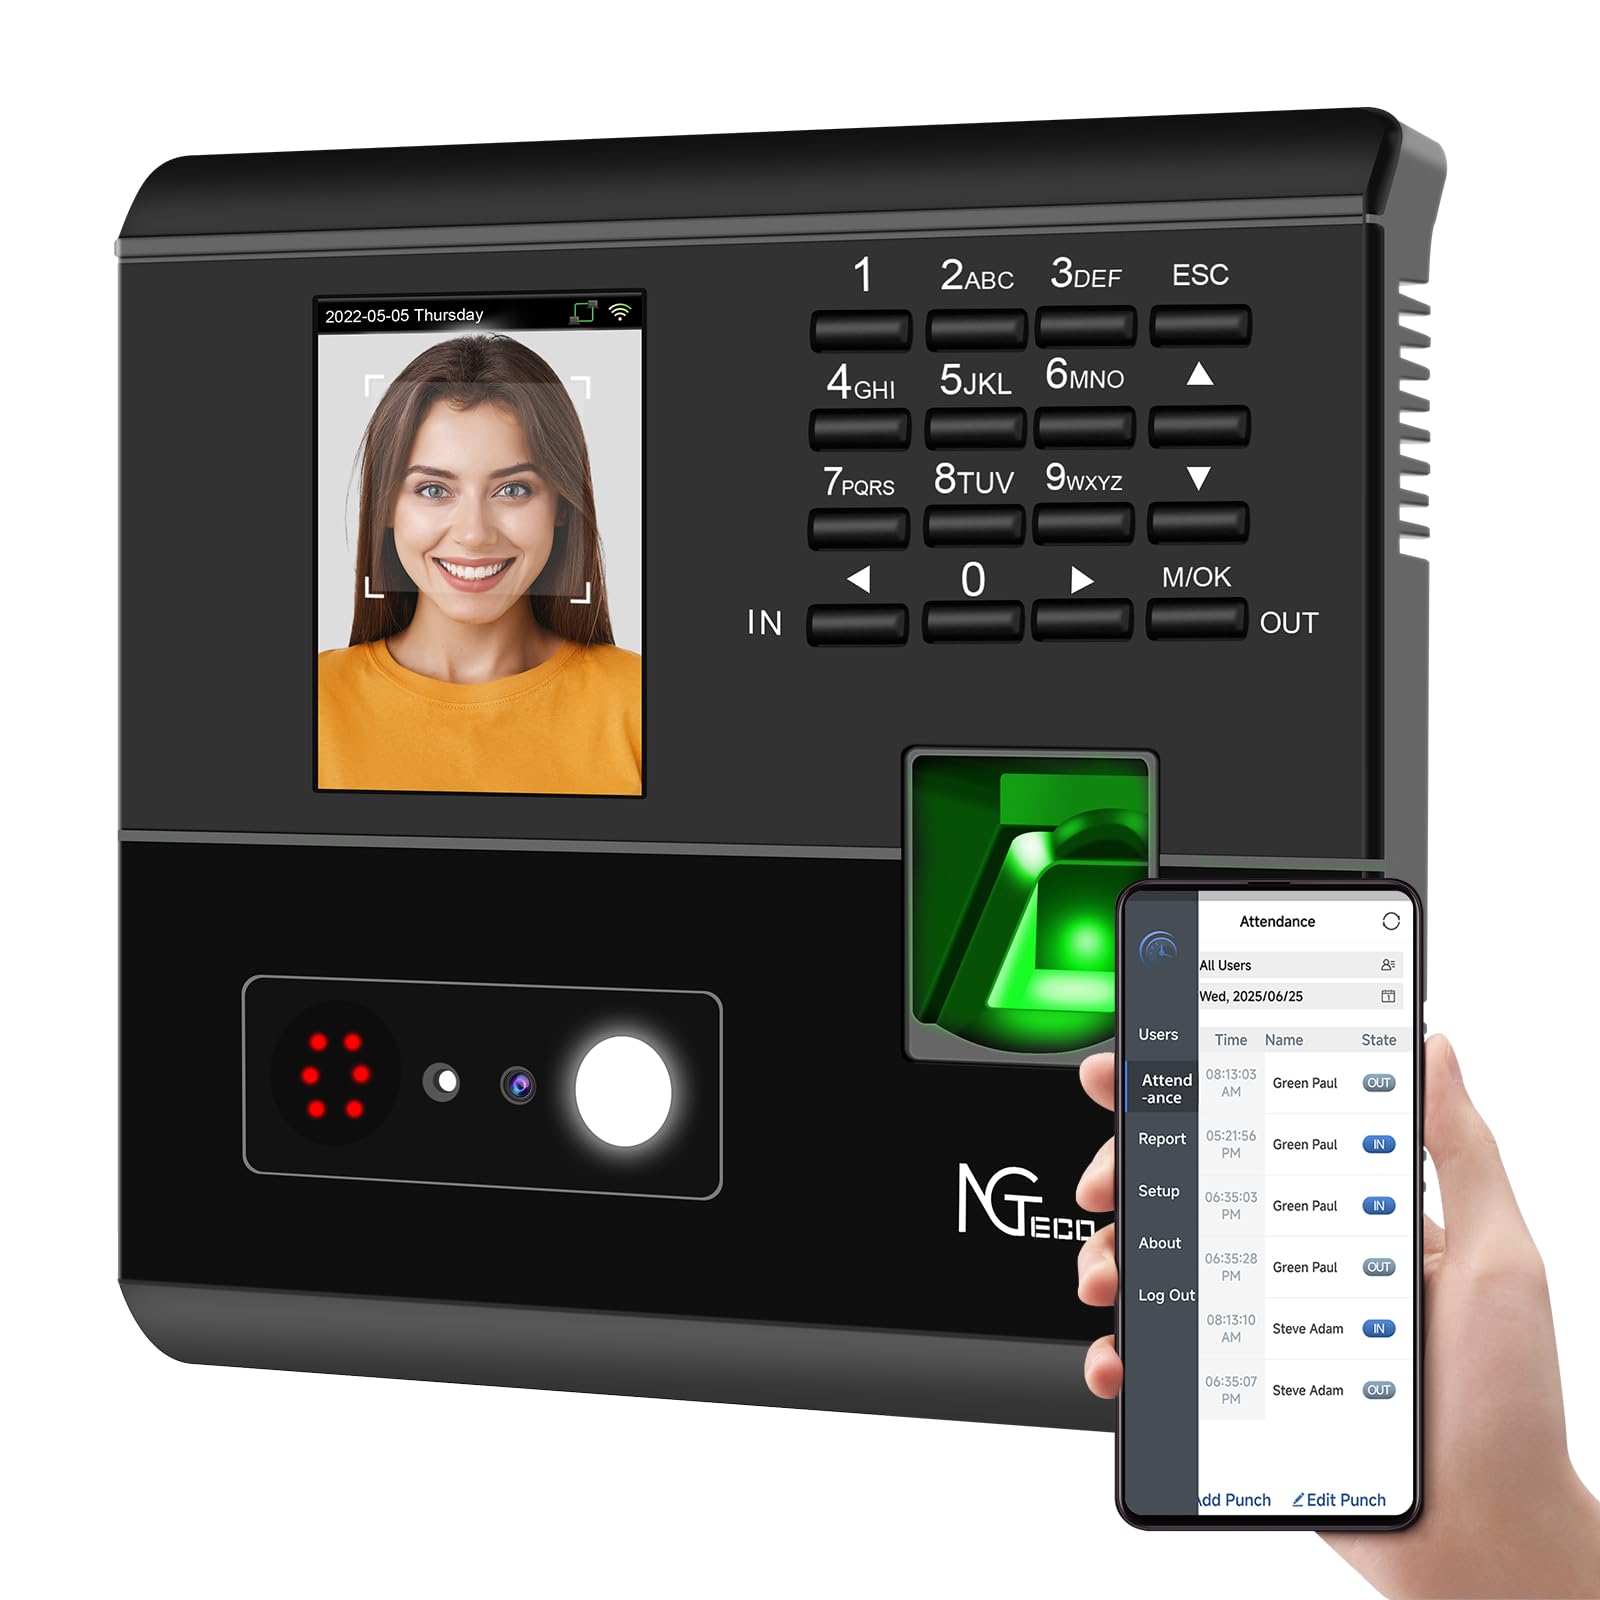
Daim duab 1: Pem hauv ntej view of the NGTeco NG-MB1 Time Clock highlighting its four verification methods: Face Scan, Fingerprint, RFID Card, and Password.
Pem hauv ntej vaj huam sib luag nta:
- Zaub Screen: Shows time, date, user information, and menu options.
- Keypad: Numeric keys for PIN entry and navigation.
- Fingerprint Reader: For biometric fingerprint verification.
- Face Recognition Camera: For facial recognition verification.
- RFID/Card Reading Area: For scanning RFID cards.
Side and Back Panel Features:

Daim duab 2: Qab view of the NGTeco NG-MB1 Time Clock, illustrating the power input, Ethernet port, and USB port for connectivity and data transfer.
- USB Chaw nres nkoj: For direct data transfer using a USB drive.
- Hwj chim Chaw nres nkoj: Txuas mus rau lub hwj chim adapter muab.
- Ethernet Chaw nres nkoj: Rau kev sib txuas ntawm lub network.
5. Teeb tsa
5.1 Kev teeb tsa ntaus ntawv
- Choose a suitable indoor location for mounting the time clock, ensuring it is at an appropriate height for all users.
- Use the provided mounting template to mark drill holes on the wall.
- Secure the wall mounting bracket using the supplied screws and anchors.
- Connect the power adapter and, if desired, an Ethernet cable to the device.
- Attach the time clock unit to the mounted bracket.
5.2 App Download tau
Download tau NGTeco Time App from your mobile device's app store (Apple App Store for iOS or Google Play Store for Android). This app is essential for managing users, attendance records, and generating reports.
Clip 1: This video demonstrates the two methods for registering employee information on the NGTeco Time Clock, including using the device directly and through the NGTeco Time App.
5.3 Kev sib txuas ntawm Wi-nkaus
To connect your device to a Wi-Fi network:
- On the device, navigate to the [Comm] zaub mov.
- Xaiv [Wireless Network].
- Xaiv koj lub network Wi-nkaus uas koj xav tau los ntawm daim ntawv teev npe.
- Enter the Wi-Fi password using the keypad and confirm.
- The device will attempt to connect to the network. A successful connection will be indicated on the screen.
Clip 2: This video provides a step-by-step guide on how to configure the Wi-Fi settings on your NGTeco Time Clock device.
6. Cov lus qhia ua haujlwm
6.1 Ntxiv cov neeg siv
Employees can be added directly on the device or through the NGTeco Time App.
Adding Users via Device:
- Nias thiab tuav lub M/OK khawm kom nkag mus rau lub ntsiab zaub mov.
- Nkag mus rau [Cov neeg siv] thiab xaiv [Ntxiv cov neeg siv].
- Nkag mus rau Tus neeg siv ID, Lub Npe, Lub Npe, thiab teem lub Tus neeg siv lub luag haujlwm (e.g., Employee, Admin).
- Xaiv ib Kev txheeb xyuas hom (Password, Fingerprint, Card, or Face).
- Follow the on-screen prompts to enroll the chosen verification method(s).
Adding Users via NGTeco Time App:
- Open the NGTeco Time App on your smartphone.
- Coj mus rhaub rau Cov neeg siv section and tap Ntxiv Cov Neeg Siv.
- Enter the employee's details including Lub Npe, Lub Npe, PIN, thiab Tso cai qib.
- Save and sync the data with the device.

Daim duab 3: The NGTeco Time App interface for effortless management, including adding users, setting up work hour tracking, and automatic punch detection.
6.2 Enrolling Biometrics and Cards
Kev Sau Npe Sau Npe:
For optimal fingerprint recognition:
- Always use clean fingers and avoid angled or tilted finger positions during enrollment.
- Place your finger belly completely in the middle of the reader.
- Do not slide the finger while enrolling. Apply some pressure for 1 second until the result is shown.
- If a finger is dry, gently breathe on it to moisten it before scanning.

Daim duab 4: Visual representation of the high-precision fingerprint module, emphasizing reliable, fast, and secure access.
Kev Sau Npe Rau Lub Ntsej Muag:
Follow the on-screen instructions to position your face correctly in front of the camera for enrollment.
RFID Card Enrollment:
When prompted, hold the RFID card near the designated reading area on the device until it is successfully registered.
6.3 Clocking In and Out
The NGTeco NG-MB1 supports automatic detection for clocking in and out, eliminating the need to press specific 'IN' or 'OUT' keys. Simply present your chosen verification method (face, fingerprint, RFID card, or enter your PIN) to the device.
Clip 3: This video demonstrates the four recognition methods (Face, Fingerprint, RFID, PIN) for clocking in on the NGTeco Time Clock.
6.4 Managing Attendance Records
Attendance records can be modified directly on the device or through the NGTeco Time App.
Adding/Editing Missing Punches:
- Ntawm Device: Access the menu, navigate to [Time Data], ces [Add Missing Punch]. Select the user, date, time, and punch state (Check In/Check Out).
- Ntawm App: In the NGTeco Time App, go to the Kev tuaj koom section. You can add a new punch or edit an existing one by selecting the user, date, time, and punch state.

Daim duab 5: The NGTeco Time App's punch record correction feature, allowing easy fixes for errors or missing punches.
Clip 4: This video illustrates how to modify attendance records directly on the NGTeco Time Clock device and through the mobile application.
6.5 Tsim Cov Ntawv Qhia
The NGTeco Time Clock supports various payroll cycles and offers multiple ways to download attendance reports.

Daim duab 6: The NGTeco Time Clock supports various payroll cycles, including Monthly, Semi-Monthly, Bi-Weekly, and Weekly, for flexible attendance management.
Report Download Options:
- App Email Download: Use the NGTeco Time App to email detailed reports directly to your inbox.
- USB Drive Download: Insert the provided USB drive into the device's USB port to download attendance data.

Daim duab 7: Illustration of the two convenient methods for downloading attendance reports: directly to a USB drive or via email through the NGTeco Time App.
7. Kev tu
- Ntxuav: Regularly wipe the device's screen, keypad, and fingerprint sensor with a soft, dry cloth. Avoid using abrasive cleaners or liquids.
- Software hloov tshiab: Check the NGTeco Time App or website for any available firmware or software updates to ensure optimal performance and security.
- Cov ntaub ntawv thaub qab: Periodically back up your attendance data using the USB drive or through the app to prevent data loss.
8. Kev daws teeb meem
- Device Tsis Powering On: Xyuas kom lub hwj chim adapter txuas ruaj ntseg rau ob lub cuab yeej thiab lub qhov hluav taws xob ua haujlwm.
- Wi-Fi Connectivity Teeb meem: Verify your Wi-Fi password and ensure the device is within range of your router. Restarting the device or router may help.
- Fingerprint/Face Recognition Failure: Ensure the sensor/camera is clean. For fingerprints, ensure fingers are clean and placed correctly with adequate pressure. Re-enrollment may be necessary if issues persist.
- Teeb Meem Sib Txuas Lus ntawm App: Check your device's internet connection and ensure the time clock is connected to the same Wi-Fi network as your phone.
- Missing Punches: Refer to Section 6.4 for instructions on adding or editing missing punches.
For further assistance, consult the Quick Start Guide or contact NGTeco customer support.
9. Cov lus qhia tshwj xeeb
| Feature | Paub meej |
|---|---|
| Hom | NGTeco |
| Qauv nab npawb | NPE-MB1 |
| Xim | Dub |
| Hom zaub | Digital |
| Tshwj xeeb Feature | Face/Fingerprint/Card/PIN |
| Khoom Dimensions | 5 "W x 4" H |
| Hwj chim Source | Corded Electric |
| Connectivity Technology | WiFi |
| Yam Nyhav | 0.79 kg ib |
| Hom khoom | Premium ABS yas |
10. Warranty thiab Support
- Warranty: The NGTeco NG-MB1 comes with a 1-year manufacturer's warranty.
- Kev pab txhawb nqa: Enjoy free lifetime technical support from NGTeco's U.S.-based service team. Support is available Monday to Friday, 6 AM to 6 PM EST.
- For support, refer to the contact information provided in your Quick Start Guide or visit the official NGTeco webqhov chaw.