Cov ntaub ntawv tseem ceeb ntawm kev nyab xeeb
Thov nyeem tag nrho cov lus qhia ua tib zoo ua ntej siv cov cuab yeej no. Khaws phau ntawv no rau yav tom ntej siv.
- Tsis txhob siv rau cov menyuam mos.
- Keep away from water sources except for cleaning as specified in this manual.
- Follow recommended cleaning and maintenance procedures to prevent electrical hazards or skin irritation.
- Tsis txhob muab lub cuab yeej rhuav tshem. Xa cov neeg ua haujlwm tsim nyog los kho txhua yam.
- Ensure the charging cable and adapter are undamaged before use.
Khoom Tshajview
The Hatteker HT-595 is a versatile 4-in-1 grooming kit designed for full-body hair removal. It features a dual-head design and multiple interchangeable attachments to meet various grooming needs.

Daim duab 1: Tshajview of the 4-in-1 multifunctional trimmer and its intended use areas.
Ntim Cov Ntsiab Lus
The Hatteker HT-595 grooming kit includes the following items:
- Main Trimmer Unit
- Lub cev plaub hau Trimmer Head
- Floating Cutting Net Head (Body Shaver)
- Nose Trimmer Head
- Rotary Shave Head (Facial Trimmer)
- Guide Combs (3/6mm, 9/12mm)
- Hnab cia
- Ntxuav Txhuam
- Hom-C USB Charging Cable
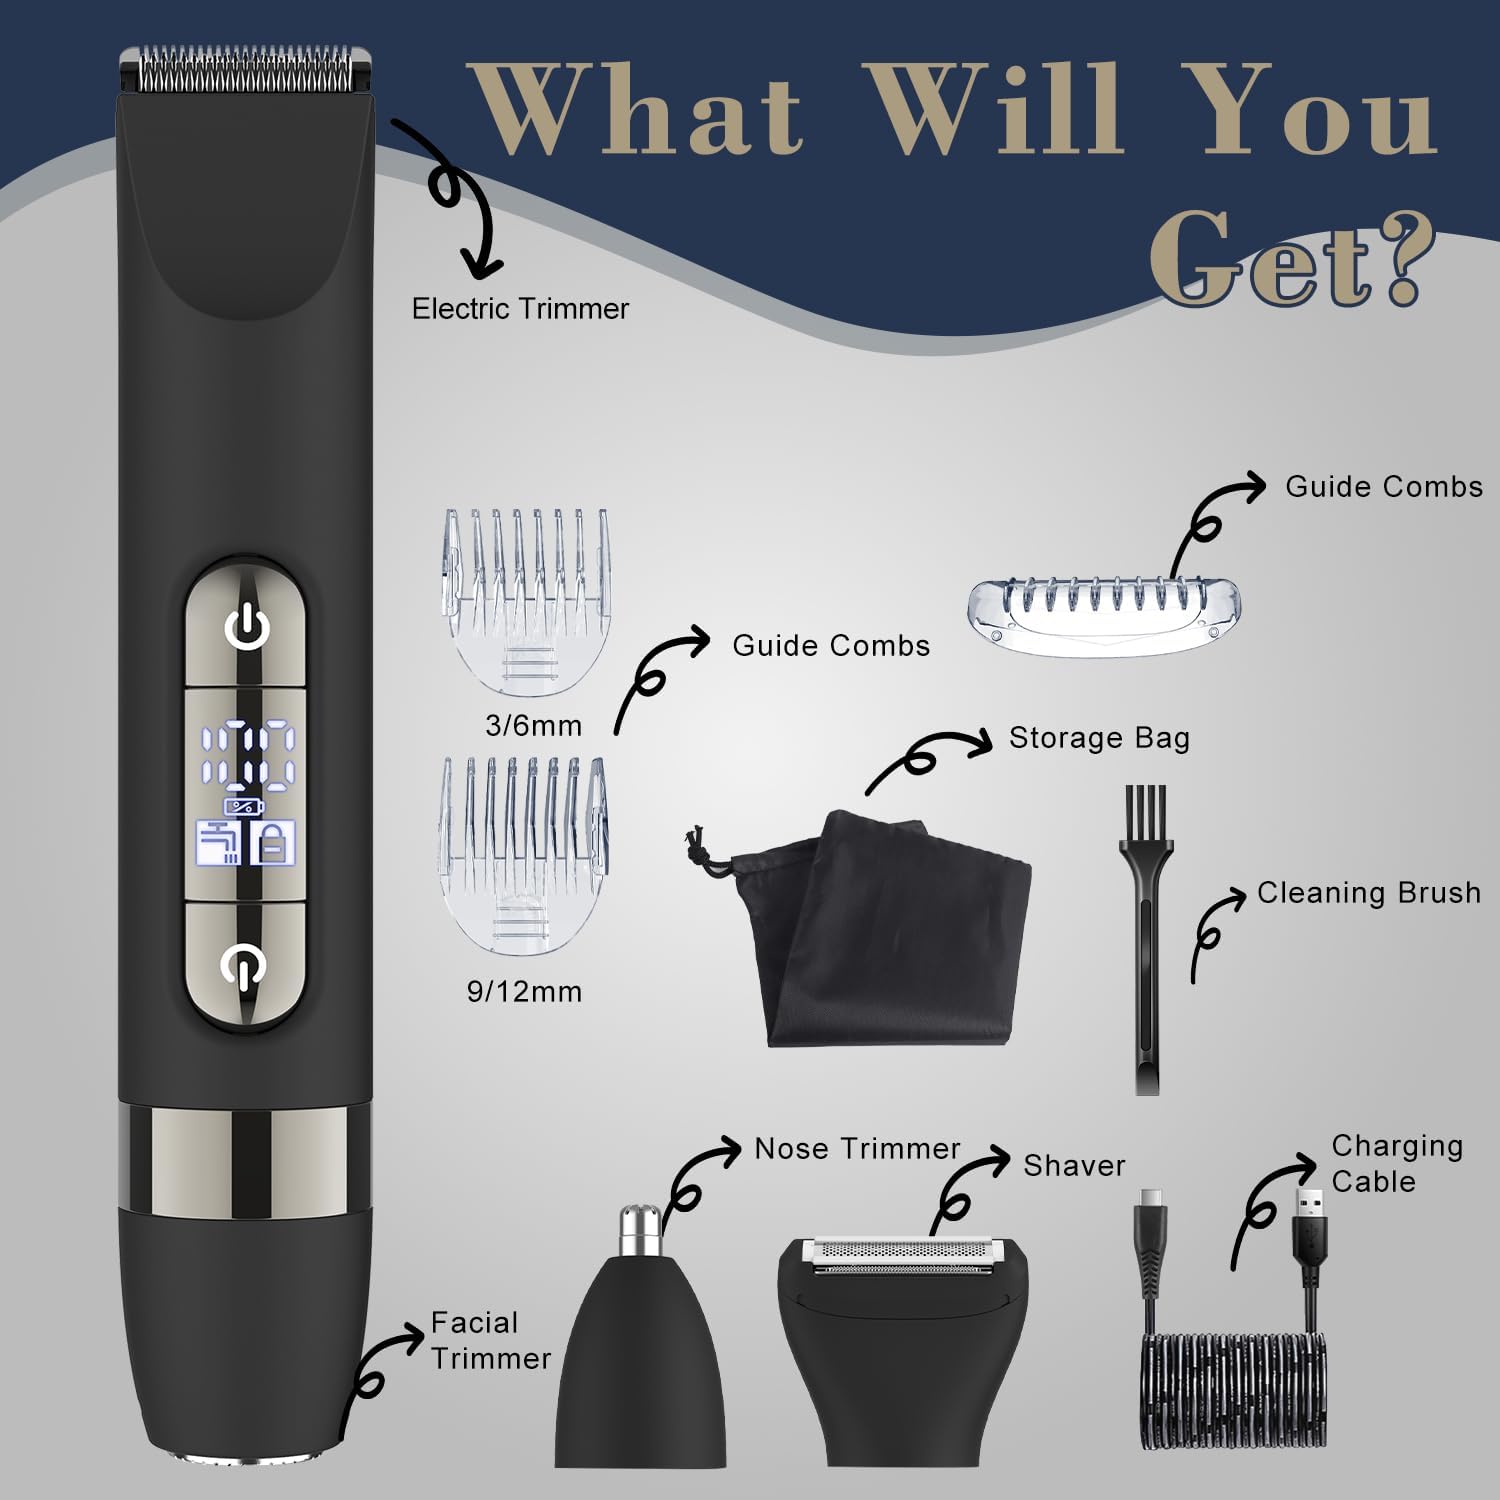
Figure 2: All components included in the Hatteker HT-595 grooming kit.
Kev teeb tsa thiab them nyiaj
Nqi pib
Before first use, fully charge the device. The trimmer uses a Type-C USB charging port for convenience.
- Connect the Type-C USB charging cable to the trimmer.
- Plug the other end of the cable into a compatible USB power source (e.g., laptop, wall charger, power bank, car charger).
- The display will indicate charging status. A full charge takes approximately 90 minutes and provides up to 60 minutes of working time.

Figure 3: Charging the device using the Type-C USB cable.
Attaching and Changing Trimmer Heads
The trimmer features interchangeable heads for different grooming tasks.
- To remove a head: Gently push the head upwards from the main unit until it detaches.
- To attach a head: Align the head with the main unit and press down firmly until it clicks into place. Ensure it is securely fastened before use.

Figure 4: Instructions for attaching and detaching trimmer heads.
Cov lus qhia ua haujlwm
Power On/Off and Travel Lock
- To power on: Press the power button.
- To power off: Press the power button again.
- To activate travel lock: Press and hold any one of the two power buttons for a few seconds until the lock symbol appears on the display. This prevents accidental activation during travel.
- To deactivate travel lock: Press and hold any one of the two power buttons for a few seconds until the lock symbol disappears.
Siv ntub thiab qhuav
The Hatteker HT-595 is IPX7 waterproof, allowing for both wet and dry grooming.
- Kev siv qhuav: For quick trims and touch-ups on dry skin.
- Kev siv ntub dej: Can be used in the shower with shaving cream or gel for a smoother, more comfortable shave.

Figure 5: The trimmer is suitable for both wet and dry grooming.
Using the Body Trimmer Head
This head is designed for efficiently trimming larger areas of body hair.
- Attach the Body Trimmer Head to the main unit.
- Select the desired guide comb (3/6mm or 9/12mm) and attach it to the trimmer head for specific hair lengths.
- Turn on the device and move it against the direction of hair growth for optimal results.

Figure 6: Using the Body Trimmer Head for various body areas.
Using the Floating Cutting Net Head (Body Shaver)
This head provides a precise shave without leaving stubble, ideal for a smooth finish.
- Attach the Floating Cutting Net Head.
- For best results, first trim longer hair with the Body Trimmer Head.
- Gently press the shaver against the skin and move it in circular or straight motions.

Figure 7: Achieving a smooth finish with the Body Shaver Head.
Using the Nose Trimmer Head
For gentle and precise grooming of nose and ear hair.
- Attach the Nose Trimmer Head.
- Carefully insert the trimmer tip into the nostril or ear canal.
- Move the trimmer gently to cut unwanted hair. Do not insert too deeply.

Figure 8: Using the Nose Trimmer Head.
Using the Rotary Shave Head (Facial Trimmer)
This head is suitable for precision trimming of stubble and fine facial hair.
- Attach the Rotary Shave Head.
- Move the shaver in small, circular motions over the desired area.

Figure 9: Using the Rotary Shave Head for facial grooming.
Kev tu thiab tu
Kev tu tsis tu ncua ua kom pom kev ua haujlwm zoo thiab ua kom lub neej ntev ntawm koj cov trimmer.
Kev Ntxuav Cov Taub Hau Trimmer
- After each use, turn off the trimmer and detach the head.
- Siv txhuam ntxuav uas muab los tshem cov plaub hau xoob ntawm cov hniav thiab sab hauv lub taub hau.
- Rinse the detached head under running water. The entire device is IPX7 waterproof, allowing for easy cleaning under running water.
- Cia txhua qhov chaw kom cua qhuav kom huv si ua ntej rov qab los yog khaws cia.

Figure 10: The trimmer is fully washable for easy cleaning.
Lubrication (Optional)
Periodically, a drop of light machine oil (not included) on the blades can help maintain smooth operation and prolong blade life.
Kev daws teeb meem
If you encounter issues with your Hatteker HT-595, refer to the following common problems and solutions:
| Teeb meem | Ua Tau | Kev daws |
|---|---|---|
| Trimmer tsis tig rau. | Battery is depleted; Travel lock is active. | Charge the device fully; Deactivate the travel lock by pressing and holding the power button. |
| Poor trimming performance or pulling hair. | Blades are dull or clogged with hair; Head is not properly attached; Hair is too long. | Clean the blades and head thoroughly; Ensure the head is securely attached; For very long hair, pre-trim with scissors or a longer guide comb before using the shaver head. |
| Ntaus tsis them. | Charging cable or adapter is faulty; Poor connection. | Check the charging cable and adapter for damage; Ensure the cable is securely plugged into both the trimmer and the power source. Try a different USB port or adapter. |
| Ntau lub suab nrov thaum ua haujlwm. | Blades require lubrication; Foreign object in the head. | Apply a drop of light machine oil to the blades; Clean the head thoroughly to remove any debris. |
Khoom Specifications
| Feature | Specification |
|---|---|
| Qauv nab npawb | HT-595 |
| Hwj chim Source | Roj teeb Powered (Rechargeable) |
| Hom roj teeb | 1 A roj teeb (nrog) |
| Them sij hawm | Kwv yees li. 90 feeb |
| Lub Sijhawm Ua Haujlwm | Txog li 60 feeb |
| Waterproof Rating | IPX7 (Ntxuav Tau Tag Nrho) |
| Xim | Dub |
| Tshwj xeeb nta | Dual-Head Design, Detachable Heads |
| Pob Dimensions | 8.58 x 5.43 x 2.01 po |
| Yam Nyhav | 12.31 hli |
Txoj Cai Tsis lees paub
Cov lus hais txog kev noj zaub mov tsis tau raug soj ntsuam los ntawm FDA thiab tsis yog tsim los kuaj xyuas, kho, kho, lossis tiv thaiv kab mob lossis kev noj qab haus huv.