1. Taw qhia
Thank you for choosing the Hbada E1 Ergonomic Office Chair. This manual provides essential information for the safe and efficient assembly, operation, and maintenance of your new chair. Please read these instructions carefully before use and retain them for future reference.

Image 1.1: The Hbada E1 Ergonomic Office Chair in a modern office environment.
2. Cov ntaub ntawv kev nyab xeeb
- Ua ntej sib dhos, xyuas kom meej tias txhua yam khoom muaj thiab tsis puas. Tsis txhob siv yog tias muaj qhov twg ploj lawm lossis puas lawm.
- Sib sau lub rooj zaum ntawm ib qho chaw mos, huv si kom tsis txhob khawb.
- Tighten all screws firmly, but do not overtighten. Recheck tightness periodically.
- Tsis txhob sawv ntawm lub rooj zaum lossis siv nws ua ib kauj ruam quav.
- Do not exceed the maximum weight capacity of approximately 120 kg (265 lbs).
- Khaws cov menyuam kom deb ntawm cov khoom txav thaum lub sijhawm hloov kho.
- Siv lub rooj zaum tsuas yog rau nws lub hom phiaj ua chaw ua haujlwm lossis rooj zaum ntawm lub rooj xwb.
3. Cov ntsiab lus ntawm pob
Before beginning assembly, verify that all the following parts are included in your package:
- Backrest sib dhos
- Seat cushion assembly
- Headrest
- Armrests (2)
- Lub tog raj kheej nqa roj
- Lub hnub qub puag
- Cov Casters (5)
- Phaj tshuab
- Footrest (if included with model)
- Hardware pack (screws, washers, Allen wrench)
4. Kev teeb tsa thiab kev sib dhos
Assembly typically takes 30-45 minutes for one person. Having a second person can simplify certain steps, especially when attaching the backrest and armrests.
4.1. Kauj ruam-by-step los ua ke
- Txuas Casters rau Base: Insert each of the five casters into the holes at the end of the star base until they click securely into place.
- Insert Gas Lift: Muab lub tog raj kheej roj tso rau hauv lub qhov nruab nrab ntawm lub hauv paus hnub qub.
- Txuas Mechanism rau lub rooj zaum: Secure the mechanism plate to the underside of the seat cushion using the provided screws. Ensure the front of the mechanism aligns with the front of the seat.
- Txuas Lub Rooj Zaum rau Lub Tshuab Nqa Roj: Carefully place the assembled seat onto the gas lift cylinder.
- Txuas Armrests: Secure the armrests to the sides of the seat cushion using the designated screws. Note that the armrests are adjustable and may require careful alignment during this step.
- Txuas Backrest: Connect the backrest to the seat assembly. The Hbada E1 features a two-stage backrest height adjustment. During assembly, choose between the high or low bolt holes based on your height and preference to fix the backrest. This allows for personalized comfort.
- Install Headrest: Slide the headrest into the designated slot at the top of the backrest.

Image 4.1: Chair dimensions for reference during assembly and setup.
5. Cov Lus Qhia Siv (Kev Kho)
The Hbada E1 chair offers multiple adjustment options to customize your seating experience for optimal comfort and ergonomic support.
5.1. Kev Kho Lub Rooj Qhov Siab
To adjust the seat height, pull the lever located under the right side of the seat upwards. While pulling the lever, lift your body weight off the seat to raise it, or remain seated to lower it. Release the lever to lock the height.
5.2. Lumbar Support Kho
The 2D lumbar support can be adjusted vertically by 4.5 cm and rotated by 45 degrees. This allows you to position the lumbar support precisely to match the curve of your lower back, providing targeted support and reducing fatigue.

Duab 5.1: Paub meej view of the adjustable lumbar support mechanism.
5.3. Kev Kho Kom Zoo Rau Lub Taub Hau
The headrest can be adjusted vertically by 13 cm and rotated by 30 degrees. Adjust the headrest to support your neck and head comfortably, relieving pressure during long periods of sitting.

Image 5.2: Headrest adjustment options for personalized neck support.
5.4. Kev kho kom haum armrest
The armrests can be adjusted vertically by 7 cm and rotated by 60 degrees. This allows you to find the ideal position to support your arms and shoulders, preventing strain, whether working or relaxing.
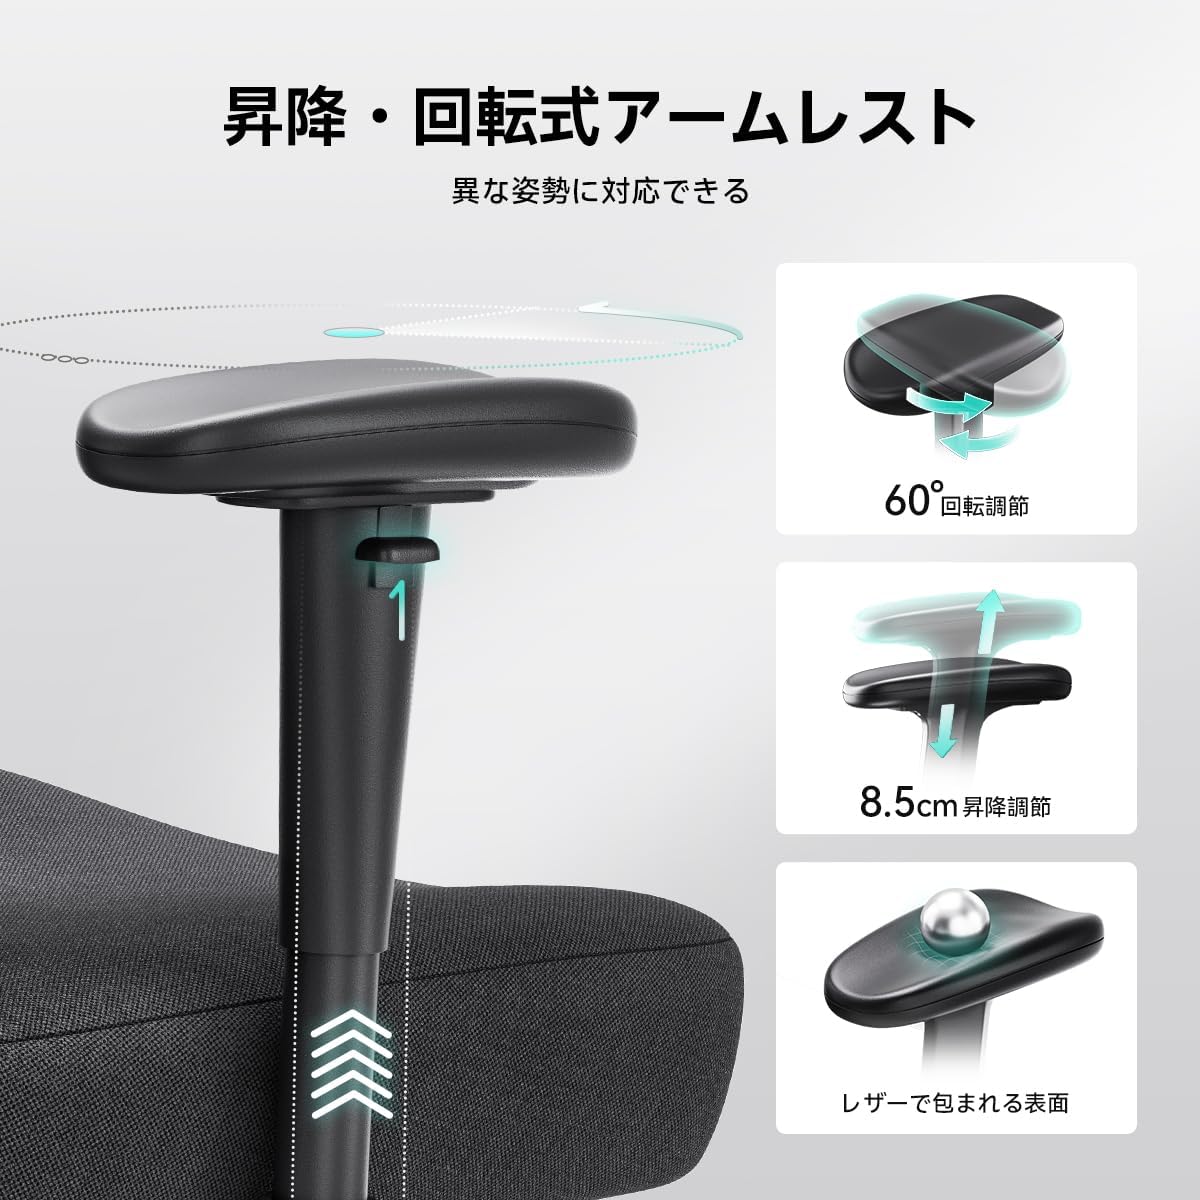
Image 5.3: Armrest adjustment features for various postures.
5.5. Kev Ua Haujlwm Zaum thiab Chaw So Taw
The chair features a reclining function that allows the backrest to tilt from 110 degrees to a maximum of 145 degrees. Use the lever on the left side of the seat to adjust and lock the recline angle. For enhanced relaxation, extend the integrated footrest. This feature is ideal for short breaks or extended periods of rest.

Image 5.4: The chair in its fully reclined position with the footrest deployed.
6. Kev tu
Regular maintenance will help prolong the life and appearance of your Hbada E1 office chair.
- Ntxuav: For mesh and fabric surfaces, use a soft cloth dampened with mild soap and water. Avoid harsh chemicals or abrasive cleaners. For the steel base and plastic parts, wipe with a damp daim ntaub.
- Casters: Periodically check casters for accumulated dust or hair and clean them to ensure smooth movement.
- Kho vajtse: Regularly inspect all screws and bolts to ensure they are tight. Retighten as necessary to prevent loosening and potential instability.
- Gas Lift: Avoid exposing the gas lift to extreme temperatures or direct sunlight for extended periods.
7. Kev daws teeb meem
If you encounter any issues with your Hbada E1 chair, refer to the following common problems and solutions:
- Chair Squeaks: Check all bolted connections and tighten any loose screws. Applying a small amount of silicone lubricant to moving parts (e.g., mechanism, gas lift connections) may also help.
- Chair Does Not Stay at Desired Height: This usually indicates an issue with the gas lift cylinder. Ensure the height adjustment lever is fully released. If the problem persists, the gas lift may need replacement.
- Lub Rooj Zaum Zoo Li Tsis Ruaj Khoov/Cobbly: Verify that all screws are securely tightened, especially those connecting the backrest, armrests, and mechanism to the seat. Ensure the casters are fully inserted into the base.
- Difficulty Reclining/Locking Recline: Check the recline tension knob (if present, usually under the seat) and adjust it. Ensure the recline lock lever is fully engaged or disengaged.
If these solutions do not resolve the issue, please contact customer support.
8. Cov lus qhia tshwj xeeb
| Feature | Specification |
|---|---|
| Hom | Hbada |
| Qauv nab npawb | E101BSC-CB (E1) |
| Khoom Dimensions | 70 cm (Depth) x 70 cm (Width) x 110-132 cm (Height) |
| Seat Height Range | 43-53 cm |
| Khoom hnyav | 19, XNUMX kg |
| Static Load Capacity | Kwv yees li. 120 kg (265 lbs) |
| Khoom siv | Urethane, Alloy Steel, Mesh Fabric |
| Lumbar Support Kho | 4.5 cm vertical, 45° rotation |
| Kev kho lub taub hau | 13 cm vertical, 30° rotation |
| Armrest Kho | 7 cm vertical, 60° rotation |
| Lub kaum sab xis | Txog li 145 ° |
| Casters | Silent PU Casters |
| Tshwj xeeb nta | Breathable mesh, Integrated footrest |
9. Warranty thiab Support
9.1. Warranty Information
The Hbada E1 Ergonomic Office Chair comes with a 3-year free repair or exchange warranty, limited to the product itself. This warranty covers manufacturing defects and malfunctions under normal use.
9.2. Cov neeg siv khoom txhawb nqa
If you encounter any initial defects, incompatibilities, or have questions regarding your product, please contact our customer service center. Our team is available to assist you with any concerns or issues you may have.
For support, please refer to the contact information provided with your purchase or visit the official Hbada webqhov chaw.


